Not being able to find your tools in your home workshop when you need them can be extremely frustrating. You search the house, check every drawer, peek into all the cabinets to no avail.
The trick is to learn how to organize your tools so they’re easy to both find and put away. If you have a complicated system of organization, you’ll never use it. So read on for some amazing tool organization ideas.
Key Takeaways
- Organize tools by type and store them in cabinets, pegboards, and shelves.
- Create zones for different tools and use clear containers for awkwardly sized items.
- Utilize pegboards, racks, and cabinets to keep tools organized and accessible.
- Use wall mounts and overhead storage for additional space and easy access.
- How to Keep Your Tools Organized
- How to Organize Tools on a Pegboard
- How to Use Racks To Organize Tools
- How to Organize Tools on Cabinet
- How to Organize Tools on Shelves
- How to Organize Tools on Wall Mounts
- How to Organize Tools on Boxes And Bins
- How To Hang Hand Tools
- How To Use a Shoe Organizer For Storing Tools
- How Do I Organize My Tools DIY?
- FAQs
- Tips to Keep Your Tools Organized
How to Keep Your Tools Organized
There are a few tricks for organizing tools in your tool room that you should know. These tricks will help you to be able to put your tools away easily so that you can find them again when you need them.
Create Zones for Different Tools
Create zones for different types of tools. You can organize the tools by the type of work, type of tool, or whatever system works for you. The goal is to know where to find your hammers, your screwdrivers, and your power tools in your workbench or tool cart.
You can also organize smaller items like screws and nails in specific areas or in a toolbox making it easy to find the exact screw or nail you need.
Arrange the Tools Inside the Cabinet or Tool Rack
Use a cabinet or tool rack to arrange your tools. Again, you’ll want to organize the tools inside the cabinet or on the tool rack by category so you can find the type of tool you need quickly. It can be extremely frustrating when you can only find screwdrivers when you need a hammer!
You can use mason jars, hooks, and shelves to create the exact organizational system you need.
Build a Tool Cabinet With Pegboard Backing
Build yourself a custom tool cabinet. The trick is to use pegboard backing instead of plywood. You can also put the pegboard on the inside of the cabinet doors.
This will allow you to use hooks and brackets to hang your tools for easy access.
Customize a Wall Panel With Containers and Baskets
Put up a slat wall system so you can customize your work area with containers and baskets. Use hooks in the slats to attach the containers and baskets to the wall. You can also use hooks to hang specific tools on the wall.
While a slat wall system works the same way as a pegboard, the slats attach flat against the wall so you don’t lose an inch of space behind the pegboard.
Hang Miscellaneous Tools Off Wall Strips
Instead of hiding your tools in the toolbox, try attaching a wall strip on your wall instead. This will allow you to hang your tools where you can easily see them and put them away. Pegboard, slats, and vertical strips will work for hanging tools as well.
Make Corner Shelves
Use up the lost corner space by putting up corner shelves in your workspace. You can purchase the rounded shelves and brackets at your local hardware store and easily install the shelves in an hour or two. This makes a great storage space for mason jars full of nuts, screws, and nails.
Organize Commonly Used Tools in a Mobile Workbench
You can create a mobile workbench for yourself and organize your tools there. It’s perfect for the tools you always find yourself reaching for. You can also add extra storage space underneath the workbench to store your larger equipment such as power tools, and air compressors.
Just ensure that you keep the top clear so that you have a place to work.
Utilize Blank Space on the End of Cabinets
Use the space on the end of cabinets. After all, cabinets and workbenches usually have empty space at the sides. So put a container on the side of your cabinet to drop tape measures, screws, and pencils.
Another idea is to put a magnetic tool holder on the end of your cabinet to drill bits, screwdrivers, and wenches.
Store Awkwardly Sized Tools in Totes With Labels
Use clear containers such as totes, bins, and buckets to store those awkwardly sized tools such as power tools, caulk, and paint rollers. Even though you’re using clear containers, you will still need to label the totes and buckets so you can easily find any tool you need.
Keep Nuts and Bolts in Clear Mason Jars
Clear mason jars are one of the best ways to keep nuts, bolts, and other fasteners organized. You can keep them on a corner shelf, build a narrow shelf to hold the jars or suspend the jars underneath a shelf. To suspend the jars, just attach the lids to the bottom of the shelf. Then screw the jars to hang them up.
Set up a Battery Recharging Station
Create a battery recharging station for yourself. This is especially useful if you use a lot of power tools. This will ensure that you always know exactly where your chargers and batteries are and that they are charged and ready to be used. This way you will never have a power tool without power again.
Be sure to set up the station near a power outlet for easy recharging. You can also store your power tools here as well.
Hang Tools Inside a Cabinet
Use pegboards and hooks to hang your tools inside a cabinet. This will prevent the tools from getting lost inside the cabinet. Remember to leave ½ an inch or so of space behind the pegboard when you add it to your cabinet.
This is to allow enough space for the hooks.
Stack Bins Vertically To Save Floor Space
After you’ve put your awkwardly sized tools into buckets, totes, and other containers, stack the bins vertically to save floor space. You may want to build a storage tower so the bins aren’t resting on each other. This way you can pull out the bin at the bottom without having to unstack everything to reach it.
Store Light Items on Overhead Storage
Light items can be stored in overhead storage areas. You can put the items in various bins so they can be stored more easily. You can also hang baskets for the light items.
Use the High Space For Seldom Used Tools
The overhead storage is also a good place to store seldomly used tools. After all, sometimes you end up with a tool that’s only used for one specific faucet or appliance. Instead of cluttering up your workspace, store it overhead.
You’ll be able to access it when you need it, but it won’t be underfoot.
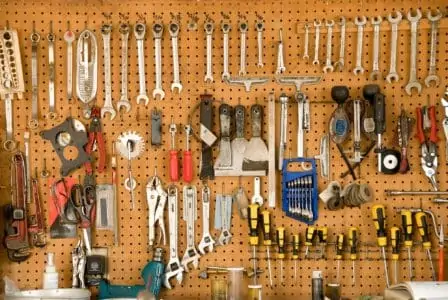
How to Organize Tools on a Pegboard
Pegboards are an amazing way to organize tools. You’ll need to ensure there’s about ½ an inch or so of space behind the pegboard so that you can insert hooks into it. TV spacers will help you create that space or you can use small blocks of wood.
Pegboard Shelf To Store Screwdrivers And Pliers
Create a pegboard shelf to store your screwdrivers and pliers. To do this, take a regular pegboard and drill larger holes in it. You can also use a plank for this. The holes need to be large enough to stick your screwdrivers and pliers into them.
Now attach the pegboard at a 90-degree angle to another pegboard or wall. You now have a place to store all of your screwdrivers!
Portable Pegboard Rack
Create a portable pegboard rack by attaching wheels to the bottom of the rack. You can create a larger base so that you can store other items behind the rack as well. Then you can hang various tools and other items you need on the rack and move them to wherever you’re working.
How to Use Racks To Organize Tools
Racks are another great way to organize tools. You can add pull-out racks or racks to store long-handled items. The trick is to be creative.
A Pull-Out Tie Rack to Store Tools
Use a pull-out tie rack to store your selves such as wrenches, paintbrushes, scissors, etc. You can store any smaller tool with a hole in the bottom this way, as it is capable of hooking onto the tie rack. The great thing is that the rack pushes back when you don’t need it and will pull out when you do need it.
You’ll be able to easily find it when you need it. You can also put it under a wire shelf or use long hooks to attach it to a pegboard.
Long-Handled Tool Rack
Install this rack to hold your tools that have long handles. These tool racks are a great way to store rakes, shovels, and extension cords on the wall where you won’t be tripping over them, with the added advantage of easily accessing the tools when you need them.
How to Organize Tools on Cabinet
Cabinets are wonderful places to organize your tools. If you’re in an area where you’re worried about small children playing with tools they shouldn’t touch or about someone walking off with your tools, you can put a lock on the cabinet.
Store Manuals In Filing Cabinets
Put the manuals for all of your tools in filing cabinets. You can also store any DIY instructions you’ve printed here. Be sure to add wheels to the bottom of the filing cabinets so that you can easily move them around when needed.
This will save you quite a bit of time in the long run because you won’t spend time searching for your tool manuals or the DIY instructions you’ve printed for future use. All the instructions, manuals, and blueprints will be easy to find inside your filing cabinet.
Tool Cabinet With Pegboard
You can make a tool cabinet from a pegboard or just attach a pegboard to a cabinet. Just remember to add space to the back so that you have room for the hooks. When you open the cabinet, all your tools are hanging along the back of the cabinet as well as the door.
It’s easy to see your tools. When you close the cabinet, everything is put away and looks neat.
How to Organize Tools on Shelves
Shelves are a great way to organize tools. You can build your shelves, purchase shelves, or hang wire shelves on pegboards.
Wire Shelving For Power Tools
Wire shelving is a great type of shelving for storing power tools. Often the tools have parts that keep them from laying flat on a shelf. For instance, the blade of a saw will keep the saw canted on a shelf.
If you’re using wire shelves, just put the blade of the saw through the wires so the saw will be stored neatly. You can do the same with other tools such as power drills. If a tool is larger, you can remove a wire to make more room for the tool.
Narrow Shelf to Store Spray Paint
Build yourself a narrow shelf to store spray paint, bottles of glue, and other spray cans. A 2X4 is the perfect width for these cans. Just add a rail to keep the cans from falling off the shelf.
You can also use the space between studs to build the shelf, provided your work area doesn’t have drywall hung.
Use Sliding Shelves to Save Space
Sliding shelves are a great way to save space. The shelves are angled along the wall so you can pull out one shelving unit to access the contents. Then push it back so that it’s out of the way.
You can then pull out the shelf next to it. This is a great way to easily maximize your storage space.
Ceiling-Mounted Shelves For Additional Storage
Mount shelves to the ceiling for additional storage space. This space is perfect for both light items and items you rarely use. Be sure to put the items in clear bins and label the bins so you know what’s inside each bin without having to search through them to find the tools you need.
How to Organize Tools on Wall Mounts
Use various types of wall mounts to store your tools. This way you can hang the tools where you can easily find them and they’re easy to put away as well. After all, that’s half the battle, putting the tools away properly so you can maintain your organizational system.
Magnets on Steel Sheet Metal to Store Screwdriver and Drill Bits
Screwdriver bits and drill bits are small and easily misplaced. As they are metal they will stick to magnets, which is then a great way to always know where they are.
The first idea is to place magnets on steel sheet metal where you can then hang your screwdriver and drill bits.
The advantage is that the steel sheet metal is large and gives you plenty of room.
Another idea is to hang a magnetic strip for kitchen knives in your work area. You can hang all the small bits of metal on this magnetic strip. However, it doesn’t give you as much room as steel sheet metal will.
If you don’t need much room at all, glue magnets on the back of containers. Then you can stick the small bits of metal there.
Build Stud Shelves Mounted On The Wall
Use the studs to build shelves mounted on the wall. You’ll attach the brackets to the studs and then lay down your shelving material. When you’re finished, you’ll have a set of recessed shelves on which you can store your tools.
Store Lawn Chairs On Mounted Wall Brackets
Put up wall brackets on the walls of your work area to store your lawn chairs. You’ll be able to hang the lawn chairs out of the way and then pull them down when you need to use them.
How to Organize Tools on Boxes And Bins
Boxes and bins are incredibly useful for organizing tools. They come in all shapes and sizes so you can customize your system of organization to fit your specific needs.
Organize Screws and Nails By Size In Labeled Bins
Use small bins to store your screws and nails by size. This allows you to easily find the exact screw or nail you need for a project. Be sure to label the bins so that you know what’s in each one.
Another idea is to attach a sample screw or nail using tape or a velcro dot to the lid of the bin. This way you can easily compare the screw or nail in your hand without opening every bin. Another help is to install a screw gauge on the wall near the bin.
Use Electrical Boxes To Store Tape Measures
Electrical boxes are the perfect size to store tape measures and other small tools. They’re cheap and easy to purchase. They’re also easy to hang.
So you can hang them on your pegboard, on the side of a cabinet, or on the wall.
How To Hang Hand Tools
Hanging your hand tools is an easy method to store them so you can always find them. You’re also more likely to put them away correctly when you don’t have to open up cabinets or toolboxes to do so.
Hang Hammers On Screws
Put large screws on the studs of your workspace or 2X4s. These screws will give you a place to hang your hammers on the wall.
Hang Chargers Near Electric Sockets
Put chargers on 2X4s near electric sockets. This gives you a recharging area that you can use when your batteries die. You can also use a shelf, shelf support, or studs to hang the chargers.
It’s handy if you can store your power tools in the same area. This way everything is organized in one area for you to find what you need.
Hang Spray Bottles From a Round Pole
Install a tension rod or pole in your garage to hang spray bottles. Just hang the bottles on their handles and they’ll be neat and out of your way until you need them.
How To Use a Shoe Organizer For Storing Tools
Shoe organizers are an excellent storage device for more than just shoes. You can use them to store tools and other items in your work area.
Use a Shoe Organizer to Store Caulk And Paint Rollers
Use a shoe organizer to store caulk and paint rollers. The shoe organizer comes with the perfect size of slots to put long and thin items into. Along with caulk and paint rollers, you can also store extra bottles of screws and nails.
Store Spray Paints In a Shoe Organizer
Another excellent way to use a shoe organizer is to store your spray paints in one. Spray paints are about the same size as shoes, so they fit perfectly into the organizer. You can also organize the paints by color so you can quickly find the spray paint you need.
Use a Shoe Organizer to Store Screw And Nails By Size
You can also use a shoe organizer to sort your screws and nails by size. Shoe organizers with clear plastic pockets work beautifully for this. Label the different slots and put the screws and nails into them.
You’ll keep your screws and nails organized so you can always find what you need.
How Do I Organize My Tools DIY?
DIY Cordless Drill Storage and Battery Recharge Station+
Build yourself cordless drill storage and battery recharge station that can be hung on the wall. You’ll be able to store your drill or drills easily and recharge the batteries at the same time. Just think, you’ll always have a full charge when you need to use your drills (1).
DIY Rolling Cart As Compressor and Pneumatic Tool Storage
Build yourself a rolling cart to store your air compressor and pneumatic tools. You’ll be able to roll it wherever you need to use it and won’t need to be making more trips or trying to carry heavy tools around your garage (2).
DIY Crate Storage Locker
Build yourself a storage locker out of crates. It’s a great place to store various tools such as power drills, hammers, and sanders. You can also easily attach wheels so that you can roll the storage locker to wherever you need it (3).
You can build yourself a flip-top storage unit to store your heavy and large power tools. It works beautifully in small spaces and isn’t difficult to build. It will give you easy access to the tools you need and will be an excellent storage unit for your large and heavy tools (4).
DIY French Cleat Blade Storage
Make a french cleat blade storage system for your saw blades. This allows you to safely store your saw blades in your garage (5).
DIY Rotating Hand Tool Carousel
You can also build yourself a rotating hand tool carousel. This allows you to spin the carousel so that you can access the hand tools you need at any given time. It also makes use of every available inch in a small space.
You will need to use an industrial-strength carousel to make it. A lazy susan will not be strong enough (6).
DIY Tool Caddy
Do you need to be able to transport and store your tools easily, especially hammers, screwdrivers, and pliers? Then this DIY tool caddy is just what you need. It includes ample storage for your tools, is as easy to carry as a toolbox, and yet makes it easier to find what you need at a moment’s notice (7).
DIY Tool Chest
Another great idea is to make yourself a rolling tool chest to store your tools. You’ll be able to store all your tools in one chest and you’ll be able to move it wherever you need it to go in your garage or work area (8).
DIY Customizable Garage Storage
The best solution is to make yourself some customizable garage storage by using a french cleat storage system. You can hang baskets, tools, racks, and magnetic strips to the french cleats. The best part is that you’re not stuck with one system.
As your needs change, you can adapt the customizable garage storage according to those needs. (9).
FAQs

Why is It Important to Organize Your Tools?
It is important to organize your tools because there is nothing more frustrating than starting a project and not finding the right tools. Organizing them means you always have access to the right tool when you need it.

What Do You Put In a Tool Roll?
Knowing what tools to put in a tool roll is crucial for correct storage. You can put hammers, wrenches, screwdrivers, pliers, and spanners in a tool roll.

How Do You Organize Tools In a Tool Bag?
The best way to organize tools in a tool bag is to keep the frequently used tools in a front pocket, while the lesser used items can go in a back storage pocket. Keep drill bits together by storing them in a separate pocket.

Where Do You Store Tools Without a Garage?
There are several places you can store tools without a garage, including yard sheds, lockable tool cabinets, under porch storage, and trash totes.

Will Tools Rust In a Shed?
Tools will rust in a shed if stored incorrectly. All metal tools are susceptible to temperature fluctuations and damp environments, which causes rust.

How Do I Maximize My Garage Space?
The best way to maximize your garage space is to store bicycles on the walls, hang spare wood, fishing rods, and brooms on homemade ceiling racks made from metal pipes, and hang as many tools on the walls.
Tips to Keep Your Tools Organized
- Make your organizational system easy to maintain. A complicated system will be forsaken as soon as you get busy.
- Plan to spend 15 minutes each week returning tools to their spots. Even with the best of intentions, sometimes life gets busy and tools don’t get returned to their designated place. So plan to spend a few minutes each week to reorganize your work area.
- Use easy-to-access bins. These can be placed on shelves or underneath your workbench or table.
- Use clothes racks to organize tools. For instance, wenches fit perfectly on tie and belt racks and are easy to store and find.
- Foam balls can be used to store paint brushes, tool bits, pencils, and awls.