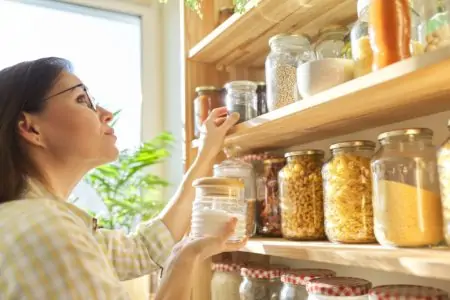
Does your pantry look like everything was thrown in there? Can’t find what you’re looking for?
Here are 25 ways to organize your pantry so it becomes an organized and effective system. Whether you’re trying to organize without containers, on a budget, or with deep shelves, we have tips for you.
We’ll start you on the path to a Pinterest-worthy pantry, whether or not you have a walk-in pantry.
Key Takeaways
- Buy containers and label them to keep food fresh and organized.
- Group similar items together, like spices and cooking oils, for easy access.
- Organize items by meal type or how often you use them, placing frequently used items within reach.
- Use storage shelves and Lazy Susans to maximize space and keep things organized.
Tips to Organize Your Pantry
Let’s dive in! Once this is done and dusted, it will be super easy to maintain, find everything, and help you make your shopping list each week.
1. Buy Containers
While we will have tips for organizing without containers, we’d be lying if we said that containers weren’t the easiest way to organize your pantry. You can get a big set of clear containers for storing your food. Then use a label maker to label everything, so you know exactly what goes into each container.
Eco-Friendly Tip
Once you have a container for everything, it’s much easier to shop at zero-waste stores, too. Bring your containers to your local zero-waste store and fill them up rather than buying more plastic packaging at your main supermarket.
2. Store Similar Items Together
This may seem obvious, but it is an important tip to remember. Organize food groups together. Keep spices, cooking oils, sweet snacks, salty snacks, broths, condiments, cereals, etc., in groups of similar items.
3. Organize By Freshness
Within hack number two, it’s also smart to organize by freshness. If you have a few ketchup bottles, and you go and buy some more, put the fresh ones at the back. This way, you’ll use the existing stuff before it’s too late and expires.
4. Some Foods Aren’t Friends
A top tip for organizing is to know what should and shouldn’t be stored next to each other. For instance, don’t store flour next to spices in case it absorbs the flavors. Onion and garlic shouldn’t go near potatoes (1). And bread should be kept in a separate box for freshness.
5. Use Straw Bins (Or Don’t)
For already-contained food, such as tinned foods, spices, and other items that already come in containers, keep them out. You don’t need to buy extra containers unless you want to.
However, if you do want to use containers for aesthetic purposes, straw bins are helpful for such items. They are open-top, so you can simply grab them from the bin without having to open up a separate container.
6. Organize By Meal Type
Another way to organize items in your pantry is by meal type. Have separate zones for breakfast foods, lunch foods, and dinner foods. You can also have a separate spot for baking supplies and snacks.
You can do this with or without containers and label makers. So if you’re on a budget, this is an affordable way to store stuff without buying tons of containers.
7. For Deep Shelves
If you have deep shelves, it can be difficult to know how to utilize the space without losing important items.
For this, we recommend keeping extras at the back. So if you pour your cereal into tubs and still have some leftover, store the extra cereal behind the container with the cereal in it. Then when the cereal runs out, you can reach back there and refill the container.
8. Line Pantry Shelves
If you have wire shelves or shelves that aren’t too pretty, you can line them with shelf liners or even foam boards. Covering up wire shelves is important so you can balance everything well and prevent things from falling through the gaps.
9. Use Varying Sizes of Containers
Don’t just choose one size and style of container. This isn’t going to be suitable for every type of food. Get a variety of sizes and styles. For example, use open-top containers for stuff that can’t be put into a separate container — such as soup, condiments, broths, etc. — and get smaller air-tight containers for spices and nuts.
10. Have a Designated Bread Box
Even if you don’t want to use containers in your pantry, you should still opt for a bread box. This keeps bread, rolls, and other such things nice and fresh.
You may want one that opens out the way rather than has a lift-off lid, so you don’t need to take the whole thing out of the pantry every time you need bread.
11. Consider Your Reach
It’s likely your pantry spans from floor to ceiling. Keep the things you use the most at eye level within easy reach. But don’t waste the high and low shelves.
Keep seasonal items up high such as cookie cutters and Christmas linen. Down at the bottom, you can store items that you use frequently but less often. This is a good place for dog food and extra stuff you’ve stocked up on.
12. Seal Your Bags
If working on a budget and avoiding containers, make sure that you buy resealable bags. If things come without resealable bags, then keep stainless steel clothes pegs on standby. These are super tight, secure, and affordable and will keep your food super fresh.
13. Have a Replenishment Container
A what now? Well, when you put things into jars and containers, you may have a lot of excess. Seal those bags and put all of that stuff in a large bin or container so when you need to top up your smaller containers, everything is in one spot, ready to go!
14. Use Storage Shelves
To make use of your space — especially if you have a smaller pantry and don’t want to waste a single inch — use storage shelves. These give you double the amount of space, so you aren’t wasting any room.
Now you can store more, buy more in bulk and enjoy seeing everything super organized at a glance.
15. Use Wide Mouth Containers
While you may be tempted to grab the first cute containers you see, it’s smart to use wide-mouth containers. So, when you need to scoop ingredients out of jars, such as rice or quinoa, you can fit your measuring device into the jar.
16. Upcycle Crates
On a budget but still want some storage organization in your pantry? Upcycle or repurpose old crates.
You may have a friend who has a ton of spare crates. You can also get them at your local grocery store or florist. Websites, such as eBay and Etsy, have tons, too!
17. Party Basket
If you tend to have many guests around, you may benefit from having a party basket. Keep these entertainment hacks at the ready, such as appetizers, paper plates, napkins, toothpicks, and more. When guests come over, take this basket down, and everything is already in one place, ready to go!
18. Cut Out Instructions
If you are moving things into containers, it’s important to keep the instructions handy, so you know how to cook the various products. Cut out the instructions from the packaging and tape them to the back of the box for future reference.
19. Install Chalkboards
On the pantry doors, use black chalkboard paint. Keep chalk nearby and write down stuff that you need to get or what’s running low so you can stay on top of everything and remain super organized.
20. Organize Your Cans By Type
When it comes to organization, gather things by type. But go a step further and organize things by type within sub-categories. For instance, organize your cans by fruit, vegetables, soup, and miscellaneous.
You can even do this for things like spices, flours, and more.
21. Be Smart About Labelling
While you can write what’s in the container on the label, such as pasta, rice, or sultanas, go a step further. Put down the expiration date, too. That way, you know when to use it, which will help you limit food waste.
22. Organize Cookbooks
If you have a large pantry and aren’t sure what to do with the dead space, create an area for storing your cookbooks! You can even keep them within the different zones, such as breakfast, lunch, baking, and dinner.
23. Store Tools and Appliances
Use your pantry for tools and appliances, too. This keeps clutter off your countertops, which is great if you want a more minimalist kitchen vibe. You can keep chopping boards, knives, utensils, coffee machines, and more in your pantry. Just take it out as and when you need it.
24. Different Baskets for Different Fruit
We buy a lot of fruit in this house! It usually ends up in one bowl, which can be aesthetic but not always practical. There’s always a little lime that gets forgotten about and falls to the bottom of the fruit bowl.
Instead, try getting different baskets or bowls for different fruits. Have a space for bananas, one for apples, one for oranges, and so on. You can even do the same for vegetables.
25. Lazy Susan
Last but not least, use Lazy Susans! These handy little storage solutions make it super easy to keep things organized but also easy to access. When you need something, just spin the Lazy Susan and grab it.
How Do I Group Items in a Pantry?
It all depends on what’s most practical for you. Here are a few ideas:
- By type: An easy and straightforward way to group things is by type. Keep food types together, such as cans, fruit, vegetables, cereals, rice, pasta, flour, bread, etc.
- By zones: You can have different zones for breakfast, lunch, dinner, snacks, and baking. This makes it easy to grab what’s necessary while cooking.
- By use frequency: You can also organize by how often you use stuff. If you use oats, fruit, and pasta every day, keep that within arms reach. If you don’t bake often, keep that stuff higher up.
- By freshness: Within the above categories, you can also organize by freshness. Keep the stuff you’ve bought recently at the back and put the stuff that needs to be eaten soon near the front.
FAQs

How Do I Organize My Pantry on a Budget?
The best way to organize your pantry on a budget is to place items in containers and jars, label them with a paint pen, put dried goods into containers, and throw out all your expired foods.

What Foods Last the Longest?
The foods that last the longest include honey, powdered goods, dried foods, and tinned items. Honey has an indefinite shelf life, while many tinned goods last for years.

How Can I Organize My Snacks Without a Pantry?
The best way to organize your snacks without a pantry is to remove them from their packaging and store them in a sealed container.

What Food Goes In Glass Jars?
The type of foods that go in glass jars includes pickled fruits and vegetables, preserves, jellies and sauces, honey, vinegars, and condiments.

Will Chips Stay Fresh In Ziploc Bags?
Chips will stay fresh in a Ziploc bag, but only for a limited time. Ziploc bags are airtight, but they also trap air inside the bag, which reacts with the chips to make them less fresh.

How Do You Organize Pasta In a Pantry?
The best way to organize pasta in a pantry is to use wide-mouthed jars. They can be varying sizes for different pasta types and the wide mouth makes it easier to scoop out the contents.
Pretty Pantry
With these 25 tips for organization, your pantry will be looking more beautiful than ever. While this is a big task and might take you all day, it’ll be totally worth it. Future you will thank you next time you go to look for a random ingredient. You’ll know exactly where it is!