You have one chance to make a first impression. You can get a good haircut, spritz a lovely aftershave, and have the trendiest outfit. But if you don’t know how to iron a shirt, it says that you don’t know how to present yourself.
With these fool-proof ironing tips, you will come across as sophisticated and put-together. Whether you’re going on a first date, attending a job interview, or just hanging out with friends, take a few minutes to iron your shirt correctly.
Key Takeaways
- Use a steam iron and read the shirt’s label for correct settings.
- Iron the shirt in a specific order: collar, cuffs, sleeves, back, shoulders, front, and placket.
- Iron damp shirts for better results and hang them up immediately after ironing.
- Use proper ironing techniques for different fabrics like cotton, linen, and polyester.
The Benefits of Ironing Your Shirt
The best part about ironing is watching TV in the background. But there are other benefits as well.
- Your shirt looks better: Smoothing out wrinkles gives your shirt a fresh, clean, and unworn look.
- You kill germs: Ironing is an important step in doing laundry because it kills germs. The heat from the iron can kill bacteria, specifically fungi and thermophilic bacteria.
- Battle shrinkage: Have you ever taken your shirt out of the dryer to find it is half the size it used to be? Ironing won’t bring it back to the way it was, but it will help. Even if you don’t think a shirt has shrunk, ironing it can battle the shrinkage you can’t see.
- You save money: Ultimately, ironing saves you money. One, because you have to replace your clothes less often. Two, because you don’t need to take it to a professional.
What You Need
To properly iron your shirts, this is what you’ll need:
An Iron
The best iron to buy is a steam iron. They are easier to use and more effective. Do your research before buying an iron to ensure it’s right for the type of shirts you usually wear.
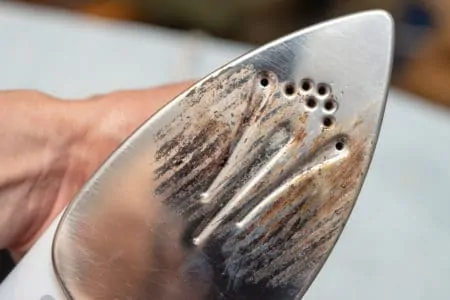
Once you have your iron, make sure that it’s clean. The last thing you need is to steam dirt into your lovely white shirt.
If it isn’t clean, mix ¾ cup of distilled water and ¼ cup of distilled white vinegar. Put it into the reservoir and steam iron a clean cloth to wash out your iron.
An Ironing Board
It’s important to invest in an ironing board. This will result in a smoother iron, and you won’t damage random surfaces you use as a replacement.
Make sure to get an ironing board with lots of padding, so it lasts for a long time.
A Clean Shirt
If you iron a dirty shirt, you could set the stains, so make sure you have a clean shirt.
Water
You will need to fill the iron with water. If you have access to distilled water, make a solution of one part water, and one part distilled water. Check what your specific iron says before adding the water.
How To Iron A Shirt
We’ll take you through the steps, so you become an expert in ironing shirts. Once you get the hang of it, doing this only takes a couple of minutes.
Using The Iron
Before you turn the iron on, you need to check your shirt’s care label instructions. Each shirt will have different requirements for washing, drying, and ironing.
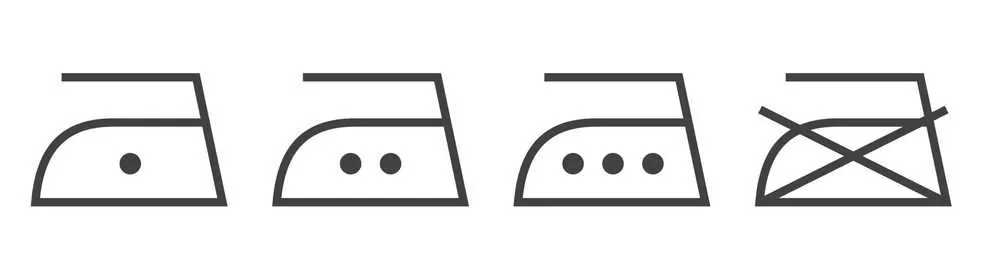
You’ll notice symbols on the label. This is what they mean:
- One dot: Steam ironing may be a risk. Iron at a cool setting instead.
- Two dots: Use iron on a warm setting.
- Three dots: Use iron on a hot setting.
- Cross through iron symbol: Do not iron.

Ironing A Cotton Shirt
Iron a cotton shirt while the shirt is still slightly damp. If it’s already dry, spritz it with some water first. Use high heat to smooth out the wrinkles.
Make sure you iron lengthwise and not in circular motions.
For thin shirts, you might only need to iron one side of the shirt. If the fabric is thicker, iron both sides.

Ironing A Cotton Blend Shirt
Use low heat and steam for a cotton blend shirt. Turn the shirt inside out and place a press cloth between the iron and the fabric to avoid iron marks and shine.

Ironing Polyester Shirts
Polyester is heat-sensitive, so it’s essential to use low heat. To safely iron a polyester shirt, use a press cloth or handkerchief to avoid direct contact between the iron and the shirt.
Start at the top of the shirt and work your way down. If you slightly dampen the shirt, it’s easier to smooth any wrinkles.

Ironing Linen Shirts
Iron linen shirts inside out. Get your handy press cloth or handkerchief to prevent iron marks and shine. Iron linen shirts while they’re still damp, or spritz with water beforehand.
Now that you understand the techniques for different fabrics, it’s time to break them down step by step.
1. Spray the Shirt
We’ve already mentioned the importance of ironing clothes while they’re still damp, but make sure to spray them first. If they’re already damp from their wash, skip this step. It’s easier to iron out creases if the fabric is damp.
2. Undo All Buttons
Undo all the buttons on the shirt, including the cuffs.
3. Iron the Back of the Collar
The first place to iron is the back of the collar. Open it flat and start at the edges.
Work your way into the middle. Iron both sides. When finished, turn the collar and run the iron over it once more to smooth out any more wrinkles.
4. Iron the Cuffs
Open the cuffs flat and work from the outside in as you did with the collar. Repeat on the other side.
Be careful around the buttons. They don’t need ironing, obviously.
5. Iron the Sleeves
Lie out the sleeves and smooth with your hand before ironing. Start with the tip of the iron at the cuffs and work backwards up to the shoulders. Repeat on both sides of both sleeves.
6. Iron the Back
If your shirt has any pleats, you must be extra careful with this step. Work your way under the pleats before ironing over them. Iron the rest of the shirt’s back.
You’ll need to move the shirt around the ironing board to cover every inch. If you have stubborn creases, spritz with water. Some irons have a spritz setting built into them.
7. Iron the Yoke
The yoke is the back and shoulder part of your shirts. Start from one shoulder and iron towards the middle. Turn the shirt around and repeat on the other shoulder.
8. Iron the Front and Placket
You’re probably learning a lot of new words today. Yoke, and now placket? The placket is the part where the buttons and buttonholes are.
Again, be gentle around those buttons. We don’t want them popping off.
Iron the placket first, pinching and pulling the bottom of the shirt to make your job easier.
Iron the rest of the front as you have been, lengthways and not circular motions.
Pro Tip
9. Iron the Front of the Collar
Use the same technique as you did for the back of the collar, working from the edges into the middle.
Why Do Shirts Wrinkle After Ironing?
You might notice you iron a shirt, but it still wrinkles. The main tip to prevent this annoying problem is to hang up your shirts immediately after ironing.
If your shirt was slightly damp before you started ironing, it still needs time to finish drying. Hang it up, so it stays wrinkle-free while it finishes drying.
How to Iron a Shirt Without Heat?
If your shirt’s label has one dot, you can use the cool setting to iron your clothes.
However, if it says not to iron at all, there are many ways to smooth out a shirt without an iron.
- Tumble dry: If the shirt can be tumble dried, spritz it slightly and toss it in the dryer on low or medium heat for 15 or 20 minutes. This should remove stubborn wrinkles.
- Distilled white vinegar: Mix one part vinegar and three parts water. Spray lightly on the wrinkled shirt and let it air dry.
- Use the shower: Hang your shirt up in the bathroom, turn the shower on hot, and close the door for 10 minutes. The steam will smooth out the wrinkles. This method won’t work as well as an iron, but it’s an excellent way to remove wrinkles without direct heat.
- Blow dry: Use a hairdryer to iron a shirt. Hold it a few inches away from your shirt and blow hot air onto the fabric.
- Press your clothes with your mattress: First, lay your shirt on a flat surface and smooth wrinkles out by hand. Roll the shirt tightly up like a burrito. Then put it underneath your mattress for half an hour to press the shirt and eliminate wrinkles.
Is Steaming Better Than Ironing?
Steaming is easier than ironing, but it doesn’t work into the nooks and crannies like ironing. If you’re in a hurry, you could opt for steaming, but if you’re dressing to impress, iron your shirt.
However, steaming is a good option if you can’t iron the shirt. It’s unlikely to damage your shirt, so it’s a good choice if your shirt’s label says not to iron. Steaming also works on items you can’t iron, such as curtains, mattresses, pillows, carpets, and more.
Both an iron and a steamer are good purchases, but they are best used for different purposes.
Pro Tips for Ironing Your Shirt
- Straighten your ironing board: There’s nothing worse than ironing creases into your shirt because your ironing board is uneven. Get the board straight and your shirt flat before ironing.
- Iron shirts while they’re damp: You can skip drying your clothes completely. Take them straight from the washing machine to the ironing board. You’ll get a crisp look with this tip if you hang it up while it finishes drying to avoid further creases.
- Save time with tinfoil: Put a piece of tinfoil under your shirt to save time. The heat will reflect off the tinfoil and essentially iron both sides simultaneously.
- Check for stains: Before you iron, check for stains. The heat from your iron can permanently set a stain, therefore ruining your shirt.
- Lint roll clothes: Before ironing, lint roll your shirt, so you don’t press dust or lint into the fabric with the iron.
- Iron inside out: When possible, always iron a shirt inside out. If you end up with a scorch mark, it’s better on the inside of the shirt than on the outside, where everyone can see it. This is especially important for dark-colored clothes because it prevents iron shine marks on the front of your shirt.
- Spray starch: Use small amounts of starch spray for the most professional finish. Do this occasionally and only on the collars and cuffs. Starch stiffens fibers, making the shirt less flexible, which can damage the shirt over time (1).
- Take care of your iron: Always empty leftover water from the reservoir to avoid scale building up.
- Keep your iron clean: Run a damp cloth over the iron to remove any residue before using it. Rub a beeswax candle over the plate and rub it off to clean the iron thoroughly.
- Iron in batches: It’s tempting to iron based on when you wear the shirt, but you’ll save time by ironing in batches. Plus, you’ll get into the swing of it so that all your shirts look uniform. Make sure you hang them up immediately after ironing to prevent more wrinkles.
FAQs

Does Ironing Ruin Clothes?
Ironing does not ruin clothes, provided that you do it right. Ironing at the correct temperature helps to maintain the shape and look of your garments, and preserve them for longer.

Will a Shirt Unwrinkle As You Wear It?
A shirt will not unwrinkle through wear, despite our desire for this to be true. Some of the larger wrinkles may smooth out, but the only way to dewrinkle your shirt is to iron it.

Do You Put Cold Water In an Iron?
You do put cold water in an iron, provided you do it before heating the iron. If you add cold water to a heated iron, you risk damaging the pan by rapidly cooling it. It also affects the way the iron presses clothes

How Do You Stop Scorch Marks?
The best way to stop scorch marks on clothes is to remove the iron, rinse the garment in warm water, and dab the singed marks with a sponge. You can also use bleach for whites to remove burn marks.

What Do You Do If You Hate Ironing?
The best way to deal with your hatred of ironing is to stop ironing altogether. Shake out wrinkles after washing and hang them to dry on hangers. Gravity removes the wrinkles as the clothes dry.
Dress To Impress
Now that you know how to iron a shirt, you can always dress to impress. Once you get the hang of ironing shirts, you’ll be able to smooth out the most stubborn of wrinkles in only a few minutes.
Until you get used to the process, you may want to print out these tips and keep them with your ironing board, so you have pristine shirts every time.