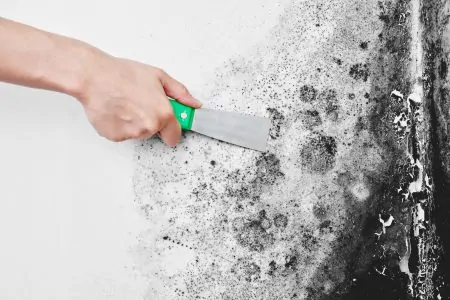
Mold is a fungus that can grow indoors as well as outdoors. There are countless species of mold, some of which are more harmful than others. Mold grows in dark, damp, and warm areas, such as bathrooms or basements.
However, not all mold is visible.
Sadly, if you have mold in one area of your home, spores could fly around. That’s right, mold spreads and reproduces through spores, which can survive severe environmental conditions (1). So, if your allergies are agitated, it might be due to mold spores flying around in the air.
We’ll show you how to test for mold in the air so that you can take the next steps for tackling the issue.
Key Takeaways
- Mold can cause allergic symptoms and affect health, making it important to test for mold in your home.
- DIY mold test kits are available and can help determine mold presence, but always follow up with a professional inspection.
- Mold can hide in various places such as behind appliances, under carpets, and inside ventilation ducts.
- Natural mold killers include vinegar, hydrogen peroxide, lemon juice, baking soda, and sunlight.
How to Test for Mold in Air
In order to test your air for mold, you’ll need a viable mold test kit. These are widely available at any home improvement store and online at sites like Amazon and Home Depot.
Once mold is determined, call a professional to do additional tests to see what type of mold is present and how to remove it.
Keep In Mind
1. Prepare the Room
Start by closing all doors and windows in the room where you will do the testing. This should be done 24 hours before the test but check your kit’s instructions. Closing off the room enables mold spores to gather without being moved around by a draft.
2. Prepare the Test Kit
A test kit will generally consist of multiple disks that have been treated with a particular substance called “microbial culture.” The treatment will promote the growth of mold spores, which will help you collect a significant amount if there are any present in the room. You should check the directions to know how long the kit should be left.
After removing the test kit from its packaging, remove the lid from the dish. Place it with the open side up on a flat surface, such as a table. Avoid the floor as it will be too low — go for a surface about the same height as a table.
3. Leave the Dish
Allow the dish 48 hours or more to gather samples. Do not touch the dish during that time.
Try to keep the room closed off as much as possible — don’t allow too much traffic in and out. To remind family members not to enter the room, you can mark the door with brightly colored tape.
4. Close the Disk
Once the time is up, put the lid back on the dish. Seal the lid onto the dish using tape to prevent spores from escaping. You can use any tape for this; scotch or electric tape both work fine. Just avoid duct tape as it’s difficult to remove.
You should have gotten a sticky label with the kit. Here, you can write the date and even duration of dish exposure. Stick the label onto the bottom of the dish and place it in a dark spot, such as a closet, shelf, or drawer.
5. Leave the Dish
The dish should remain closed in a dark spot for two days. After that time, check the dish for any signs of mold growth. During the two days, the spores would have begun growing and forming a mold that looks similar to what you’ll find on old food.
If you notice mold, you can send the dish to a lab recommended by the manufacturer. The lab will run tests to determine the type of mold and how to treat it. You can find many kits with an envelope ready to be mailed.
On the other hand, if you don’t notice any signs of mold within the dish, you can return it to the dark spot. Leave it for another few days and check daily for any signs of growth. If there are still no signs of mold five days after the date on the label, there’s likely no mold in that room.
Take Note
6. Wait for the Results
After sending in your dish, you’ll have to wait three to eight weeks for the results. It would be a good idea to continue testing in other rooms and areas of the house during this time.
How Mold Affects Your Health
Mold produces irritants and allergens that can cause various reactions when inhaled or touched. Reactions to mold often display as allergic symptoms such as sneezing, red eyes, runny nose, and skin rashes.
Sensitive individuals may experience immediate reactions when in contact with mold. Others, on the other hand, might have delayed symptoms (2).
Individuals with asthma may have a tough time when in a room with mold. Mold can trigger asthma attacks while irritating the throat, lungs, nose, and eyes.
People who don’t suffer from allergies or asthma may also experience irritation in the eyes, nose, lungs, and throat.
One mold species, in particular, can be more hazardous than others — Stachybotrys chartarum. This species is generally called “black mold” or “toxic mold.” Despite the name, this mold is more greenish and is gooier in texture compared to other species.
Black mold can grow on surfaces high in cellulose and low in nitrogen. These include fiberboards, paper, dust, and lint. This mold requires constant moisture in order to grow, so it’s commonly found near water damage, leaks, and after floods.
While mold, in general, isn’t toxic or poisonous, some species, such as black mold, can produce toxic byproducts. One of these is called mycotoxins. However, little research is available on how it affects people’s health (3).
Common Mold Hiding Places
All mold needs to grow is moisture, darkness, and warmth, but where exactly should you look when you suspect a mold problem? Here are a few familiar places around the house where mold is likely to grow (4):
- Behind appliances such as a refrigerator or dishwasher.
- Behind drywalls where plumbing pipes are located.
- Underneath cardboard or old newspapers.
- Beneath sinks.
- Inside ventilation ducts.
- Under carpets, particularly in the padding.
Signs of Mold
It can be difficult to know if or where you have mold in your home. By knowing the signs, you can take a step in the right direction to get rid of the fungus problem (5).
- Smell: Mold can cause a pungent odor, which can be described as musty or earthy. Moldy odors shouldn’t be ignored but should be further inspected.
- Allergic symptoms: If you’re experiencing a runny nose, coughing, or other hay fever-like symptoms, you might have mold. Some people might experience worse symptoms when at work or in other locations. This could mean there’s mold growing there.
- Visible mold: This might be an obvious sign of mold, but you must take immediate action since it can spread rapidly.
FAQs

How Can I Test for Toxic Mold?
If you suspect or fear toxic mold is growing in your home, you won’t need any special tests. A test such as the viable test kit we learned about above will detect all kinds of molds present. By sending your petri dish to a lab, you can get a better idea of which types of molds are growing and then take the correct actions.
The next step should always be to consult a professional for further tests and investigations. Test kits are more of a guidance than something to rely on fully.
It’s also important to understand that simply because it’s called “toxic mold,” it doesn’t mean it’s toxic to you. As we mentioned above, molds that produce mycotoxins can affect some individuals, while others won’t be affected.
However, if you suspect you have been exposed to toxic molds, your doctor can run a few tests. A blood test can help to determine if you’ve been poisoned by checking biotoxins in your blood (6).

How Much Does It Cost to Test Your House for Mold?
Getting your home professionally inspected for mold isn’t cheap. The average cost for an inspection is around $650. But, it can range between $250 and $1000 depending on the size and location of your house (7).
Many homeowners are enticed by the affordability of DIY test kits, usually available at around $40 or less. However, it’s crucial to get the house inspected by professionals if mold is detected or suspected.

How Can I Know If There’s Mold in My Carpet?
The plush fibers of a carpet can be a thriving spot for mold spores. It’s easy for the spores to stick to the surface, and there’s often a significant amount of dirt, dust, and bacteria. Once moisture is introduced, mold will likely begin to grow.
Mold can grow inside the carpet or underneath. The padding or backing of carpets is likely to have mold if exposed to moisture.
A tell-tale sign of mold in a carpet is a musty or even sour odor. However, the best way to know whether or not there’s mold growing in your carpet is to pull it up and inspect it.
If you do find mold, consider the severity of it and whether the carpet is worth trying to save or not. You can easily remove the area affected by mold and replace it with new carpeting. Adding additional waterproof padding can help keep mold and mildew at bay.

How Accurate is Mold Testing?
Mold testing is extremely accurate, provided you have a reliable mold testing device or have employed a reputable company to carry out the test. This Mold Armor Testing Kit is among the most popular and offers results in just 48 hours.

What Does Mold Poisoning Feel Like?
Mold poisoning feels like you have a bad cold. You suffer from wheezing, breathing difficulties, itchy or red eyes, and blocked nasal and throat passages.

What Kills Mold Naturally?
Vinegar is the number one natural mold killer. However, hydrogen peroxide is also effective, as is lemon juice and baking soda. Sunlight and dry conditions are also adequate for mold eradication.
Getting to the Root of the Problem
Mold can affect your health in different ways; some people have severe reactions while others don’t experience any.
Common health effects of mold include hay fever-like symptoms such as a runny nose and red eyes. If you have allergies or asthma, you’ll likely experience more severe reactions such as asthma attacks or skin rashes.
Mold spreads and reproduces through spores in the air. You can buy DIY home test kits to help determine whether or not there’s mold present in your home. Yet, as popular as these tests are, you shouldn’t rely on them entirely. Always follow up with a professional inspection and treatment.