Have your paint brushes seen better days? Maybe they’re caked with paint or glue; maybe the bristles are stuck together and misshapen; maybe they’re stained with dry paint. If your paint brushes aren’t clean, the artwork you create isn’t going to be as beautiful as it could be.
Whether you have paint brushes, paint rollers, latex, or oil-based paint stains, we’ll show you how to clean them.
Consider this your ultimate guide to cleaning your paint brushes. We’ll help you take your paint brushes from almost unusable to like-new in just a few minutes!
Key Takeaways
- To clean paint brushes, first remove excess paint, rinse, and scrub with a dish scrubbing brush.
- Comb bristles with a paint comb or fork, then swirl in the appropriate solvent for 10 seconds.
- Rinse again, making sure the water runs clear, and dry brushes flat on a towel.
- For dried paint, soak brushes in specialized brush cleaner or distilled white vinegar, then scrub and rinse.
Choosing the Right Paint Brush
One of the main reasons we highlight the importance of cleaning your paint brushes is that these art tools are expensive. You want to maintain them, so you get your money’s worth.
While you can quickly grab the cheapest paint brushes you see, it’s important to know how to choose high-quality brushes in the first place.
Here’s our main advice:
- Consider the bristles: You should aim to match the bristle type to what you’re painting. Paint brushes are made with either synthetic bristles or natural bristles, such as animal hair. Choose synthetic bristles if you’re using paint that you can clean with water. If you’re using oil-based paint, choose natural bristles since they provide a smoother finish. If you use natural bristles with water-based paints, the bristles will become too soft since they absorb more water.
- Synthetic bristles: We recommend a nylon/polyester blend or a Chinex-bristle brush if you choose synthetic bristles. These are soft, provide smooth results, and allow for more control while painting.
- Natural bristles: When it comes to natural bristles, the general rule of thumb is that the more expensive the brush, the better quality it will be. You can find complete sets for around $10, but you can also find single brushes for around $5, which would imply the brush is of better quality. Stick to your budget, but don’t go too cheap. You’ll also find various types of bristles, including pony, hog, squirrel, and more. Each excels in various types of paints. For instance, use ox bristles for watercolor or tempera. Use sable hair for watercolor and oil.
- Paint brush size: You will require different sizes if you’re painting a small canvas or an entire house. You can find brushes millimeters wide or brushes that span up to a few inches. If you’re painting a house, we recommend a paint roller, though.
- Brush end: You’ll find three types of brush ends: chisel trim, square trim, and angled. These are more for painting houses, rather than pictures. Chisel trim is great for corners and edges since it creates a straight line. Square trim brushes are best for flat areas. Angled brushes are cut at an angle for window trims.
- Brush styles: As well as brush ends, you’ll also get various brush styles. Thin angle sash is great for corners and edges. Angle sash is best for ceiling and painting trim. Flat sash is best for flat areas. Trim brushes are flat, and therefore best for large flat surfaces like exterior siding. Wall brushes are thick and flat and can be used instead of a roller for painting a wall.
- Handle: You should also consider the handle material and length. Most are made from wood or plastic, but you must make sure that it’ll be comfortable in your hand. If you’re painting with oils or acrylics using an easel, you’ll want a longer handle, so you don’t smudge your artwork. Shorter handles are best for flat painting, detailing, or painting houses.
Take Note
Brushes often have numbers on them to refer to the width of the bristles. However, many people choose to ignore these because the dimensions vary from brand to brand. While a “six” from one manufacturer may mean one thing, a different brand’s “six” could be completely different. We recommend looking at each brush individually.
What Type of Solvent to Use
When you’re cleaning your paint brushes, you will need a solvent. What type of solvent you use depends on the type of paint you used.
For latex paint, we recommend hot water and dish soap. You don’t need to use harsh chemicals when cleaning latex paint.
For oil-based paint, we recommend cleaning with paint thinner, mineral spirits (often known as white spirits), or turpentine.
Caution
When cleaning oil-based paint brushes with such solvents, make sure to work in a well-ventilated area. It’s best to be outside. Wear protective equipment if possible. Never clean solvent-laden paint brushes around open flames or electrical appliances. Always keep the solvent out of reach from kids and pets.
How to Clean Paint Brushes
This method applies for cleaning your paint brushes immediately after using them while the paint is still wet.
- Time: 25 minutes
- Difficulty: Easy/Intermediate
What You’ll Need
- Sink (or basin for oil-based paint)
- Hose (for oil-based paint)
- Newspaper or paper
- Solvent
- Jar or bucket
- Wooden stick or skewer
- Paint comb or fork
- Dish scrubbing brush
- Clean cloth
- Towel
1. Remove Excess Paint
This is a necessary step to start with as it will make the cleaning process so much easier.
To remove excess paint, you can use up all the paint on the brush. If you’re painting a wall, this is easy. If you’re painting a picture, it’s a bit more difficult.
If you can’t use the paint, you can remove it by scraping it back into the tin. Scrape it against the edge and let it drop into the tin.
Lastly, wipe the paint brush against the newspaper or plain paper to remove the last bit of excess.
2. Rinse and Scrub the Brush
For latex paint, run the paint brush under the tap, rinsing out the brush. Use your dish scrubbing brush to gently clean the brush as you go. Also, clean the brush’s exterior, the joint, and the handle, as it is usually covered in paint after fun projects!
When cleaning oil-based paint from brushes, use an outside hose to rinse off the brush into your basin. You shouldn’t clean oil-based paint brushes in the sink as the paint, and the solvent can damage the septic or drainage system.
3. Comb the Bristles
Paint can hide between the bristles, making it hard to remove with the above steps. Don’t skip this step! It will help get your paint brushes thoroughly clean.
Use your paint brush comb (or fork) to spread the bristles apart and remove hidden paint. Do this while running the brush under water to help remove the loosened paint as you go. Repeat 10-15 times or until you notice that there is no more paint coming from the bristles.
4. Prep Your Solvent
Time to deep clean the brush, remove all paint, and prevent stains.
If using dish soap and water, fill a small bucket or jar ¾ of the way full with warm water and three tablespoons of dish soap.
If using solvent, remember to go outside first and wear protective equipment. Fill a small bucket or jar up with mineral spirit or turpentine.
5. Clean Brush In Solvent
Submerge the paint brush into your solvent and stir for 10 seconds. Wipe and squeeze the brush against the side of the jar. Wearing gloves, massage the bristles to remove excess paint.
6. Rinse
Go back to the sink or basin and run the brush under water (warm, if possible) again to rinse them off. Fill up your bucket or small jar with water, dip the brush in and check that the water remains clear. If so, your paint brush is clean. If paint seeps into the water, it might be necessary to repeat the above steps.
7. Dry the Brushes
We won’t skip this step as it’s vital for maintaining your brushes.
First, shake the brushes to remove excess water. Blot the brushes on a clean cloth to absorb excess water. Then hang the brushes up or lay them flat to air dry.
Top Tip
If it would be worth the investment, you can use a brush and roller spinner to speed-dry your paint brushes. These also work for cleaning the brushes, but people love them because they speed up the drying time.
8. Discard Oil-Based Waste (Not applicable for water-based paints)
After cleaning oil-based paint, you will be left with a basin full of dirty water and loosened paint. Since it can’t go down the drain, you will need to leave the basin outside for a few days. The water will evaporate, leaving behind loosened bits of paint and other debris. You can put that in the trash once you’re able to.
Sometimes the hazardous chemicals float to the top of the water after a few days. Fish them out with a net or gloved hand and remove them. Then you can dispose of the water into a public sewer system rather than a septic tank.
How to Clean Paint Rollers
After spending hours painting a wall, the last thing you want to do is clean the paint rollers. But it’s so important. The next time you go to use the rollers, you’ll thank yourself.
Keep in mind this method is for how to clean paint rollers immediately after use while the paint is still wet.
- Time: 10 minutes
- Difficulty: Easy
What You’ll Need
- Putty knife
- Sink (basin for oil-based paints)
- Hose (for oil-based paints)
- Dish soap (optional)
- Towel
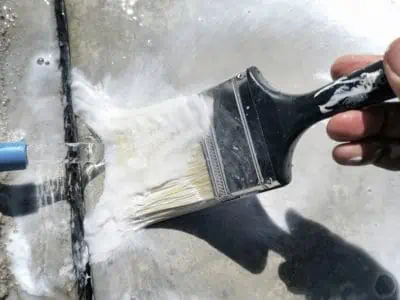
1. Remove Excess Paint
The first step is to remove as much excess paint from your roller as possible. Working over your paint tin, scrape the roller with a putty knife to remove excess paint. This will make the following steps easier. Plus, it ensures you don’t waste paint since it goes back into your paint tin.
Try This
If you don’t have a putty knife, you can scrape off excess paint with a flat metal spatula.
2. Rinse Roller
Rinse the middle of the roller with lukewarm water. This will remove paint inside the roller, which is essential because the next time you put the roller on a roller frame, it will be more difficult to insert and remove.
Then, stand your roller vertically in the sink and aim the water into the middle. This creates a fountain and runs down the side of the roller. This means you can leave the roller while it’s rinsing since it can be time-consuming!
After a couple of minutes, flip the roller the other way and repeat.
After another few minutes, run the roller under the faucet while massaging the roller with your hands to remove more paint.
If working with oil-based paint, you won’t be able to leave the roller with the hose, so just aim it into the middle and hold it there for a few minutes per side.
3. Add Dish Soap (Optional)
If the roller still looks dirty, you can apply a little dish soap over the roller. Scrub it in with your hands (wear gloves if you prefer) and rinse it under lukewarm water while massaging it with your fingers. This will help to remove paint and stains.
4. Dry the Roller
Return the roller to the frame and go outside. Shake the roller well to remove excess water and fluff up the fibers. Afterward, let the roller air dry thoroughly while standing vertically on a towel. This will prevent one side from becoming flattened.
How to Clean Dried Paint Off Brushes
The above methods were suitable for cleaning fresh paint. But how do you wash paint brushes with hardened paint? It’s a little tricker but not impossible.
We’ll be using a DIY paint cleaner made from distilled white vinegar for this method.
- Time: 1 hour
- Difficulty: Intermediate
What You’ll Need
- Small bucket
- Specialized brush cleaner or distilled white vinegar
- Gloves
- Soft-bristled brush
- Brush comb or fork
- Sink
1. Soak the Brushes
Place your paint brush(es) into your small bucket. Fill the bucket with your specialized brush cleaner or distilled white vinegar. Make sure you wear gloves as the cleaner — even the vinegar — can irritate your skin.
Soak the brush in the cleaning solution according to the packaging instructions. Usually, this will be around 20-30 minutes. If using vinegar, soak the brush for 1-2 hours or until the paint begins to loosen from the bristles.
Extra Tip
If you’re using vinegar and not seeing results, place the brush into a pot. Pour vinegar over the brush and bring the pot to a boil on the stove. Once it’s started boiling, remove the pot from the heat and let it cool down.
2. Scrub the Bristles
After the brushes have soaked, use your soft-bristled brush to gently brush the bristles downward. You should see the loosened paint begin to come off of the bristles. Continue (gently!) until the bristles are clean. This could take 10-15 minutes, depending on the size of the brush.
Repeat on both sides of the brush.
3. Rinse the Brush
Run the brush under clean water to rinse out the loosened paint. Use your soft-bristled brush to continue scrubbing out the paint. Remember to always brush downwards to prevent water from getting into the brush’s joints.
4. Spin the Brush
Hold the brush’s handle between your palms, squeeze together and rub your hands back and forth to spin the brush. This will remove excess water.
5. Comb the Bristles
Using your paint brush comb or folk, gently comb the bristles downwards to remove any extra old paint. Be gentle, so you don’t damage the bristles.
6. Double Check and Dry
Submerge the bristles into a bucket of clean water to make sure that it’s clean. The water should remain clear.
If the brush is still dirty, repeat the steps.
When it comes to drying the brush, shake the brush gently. Blot the brushes on a clean cloth to remove excess water. Then hang the brushes up or lay them flat on a towel to air dry.
Take Note
There might be old stains on your brush bristles, especially if you left the paint there for a while. Don’t worry about the stains as long as the bristles feel soft and the water runs clear.
Cleaning Paint Brushes With Vinegar
Vinegar is a suitable alternative to mineral spirits and dish soap. So whether you’re cleaning oil-based or latex paint, you can swap the cleaner out for vinegar.
The most effective way is to boil the vinegar first, so bring it to a boil on the stove. When it starts boiling, remove it from the heat, submerge the bristles in the hot vinegar and let it soak for up to 30 minutes. Then comb out the bristles to remove the loosened paint.
How to Store Paint Brushes Correctly
If you want your paint brushes to last (basically) forever, it’s important to know how to store them the best way.
If you’re using the brushes again soon and just need a short-term solution, you can leave the bottom ⅓ of the bristles in the paint. This prevents the paint from drying and hardening the bristles. We only recommend this if you’ll be returning to the paint within a few hours.
If you’ll be returning to the paint within the same day, but not right away, wrap the paint brush bristles in plastic, making a tight seal. Use masking tape to secure the plastic wrap. Place the brushes in a cool spot at home.
For longer storage solutions, such as after you’ve cleaned and packed your brushes away, make sure that the brushes are 100 percent dry. Reshape the bristles using a comb or fork. Then hang the brushes vertically with the bristle end pointed down. This prevents the bristles from getting flat or misshapen during storage. You can use a brush rack for this hack.
Another storage option is to use protective covers over the bristles and place them in a canvas pouch. Most paint brushes come with protective covers. If you’ve lost yours, you can make your own with cardboard and duct tape.
Brush Maintenance Tips
We’ll share our favorite maintenance tips to keep your brushes in the best condition for longer. Plus, we’ll show you how to use your paint brush properly, so it doesn’t become damaged. Now, whatever you’re painting will look much better!
- Clean brushes right away: Don’t leave the brushes out. Clean them right away. It’ll be much easier to clean them. If you leave them out, the paint will harden onto the bristles.
- Wash the base of the bristles: Don’t just clean the bristle tips. Clean the entire bristle, including the part near the ferrule. Yes, this is harder to clean, but it is so important.
- Be gentle: Don’t be too rough when cleaning your paint brushes, or the bristles will change shape and size. Be careful, slow, and gentle, even if it takes longer.
- Don’t soak for too long: Don’t soak your brushes overnight in the solvent. If you’re using turpentine or mineral spirits, don’t soak the brushes at all. The way the solvent softens the bristles can cause the bristles to change shape, especially if you’re soaking the brush vertically.
- Keep the bristles soft: Quickly dunking them into boiling vinegar for a few minutes is super effective. Do this before and after cleaning your brushes.
- Choke up and flatten the brush: These two painting techniques will help you get a more accurate stroke. When you achieve the painting results you want, you’ll be less frustrated, which in turn, can help you treat the brush better, so it lasts longer. Firstly, choke up the paint brush. This means that you hold the handle closer to the bristle end, giving you more control over the brush. Secondly, flatten out the brush by pushing the brush down onto your painting surface quite close to the edge before working your way in over the line. Keep the pressure to ensure that your hand remains steady, and the strokes are more even.
- Don’t use too much paint: When dipping your brush into paint, try and only keep the first ½ of the brush wet. You don’t need to saturate the entire brush in paint. This will make it harder to clear and clean the bristles.
When to Replace a Paint Brush
When you know how to wash paint brushes the right way, replacing them should be the last thing on your mind. But there does come a time when you will need to buy new ones.
Replace your paint brush if:
- The bristles are shedding: Molting bristles means that the paint brush is near the end of its life. Time for a new brush. Don’t worry; it will make your artwork so much better.
- The brush has lost its point: Round brushes and rigger brushes meet at a point. If the brush no longer has this defined point, it’s time to update it. Don’t throw the brush away, though. You can keep it and use it without the tip for different parts of your painting. You could also cut the very end off and use the brush for stippling or dry brushing.
- Bristles are misshapen: It’s important to comb your bristles out and reshape them after cleaning to ensure they don’t get stuck in a wonky way. But if your bristles won’t go back into their original shape no matter what you do, then it might be time for new brushes.
- Your painting is jagged: If you can’t paint a smooth, accurate line with the paint brush any longer, it’s time for a new one.
- Too difficult to clean: If you followed our cleaning method and it doesn’t work, then it might be that the paint brush is beyond cleaning help.
- Broken handle: If the handle is broken or splintered, you should replace the brush.
Don’t Waste It
Just because you can’t use the brush for its initial purpose, doesn’t mean you need to be wasteful and throw it away. You can use the brush for other uses, such as dry brushing, textured painting, cleaning, and more.
FAQs

Can a Paint Brush Last For Life?
Probably not for life, but with the proper care, they should last several years.

Is It OK to Clean Paint Brushes In the Sink?
If you’re using latex paint and you have a public sewer system (rather than a septic system), it’s fine to clean paint brushes in the sink.
However, if you have a septic system, washing your brushes in the sink can send hazardous chemicals into your drains. This can cause contamination, hazards, and blockages, leading to expensive repairs.

Can You Use a Wire Brush to Clean a Paint Brush?
We recommend against it. The wire material can damage the fine bristles on the brush. Use a soft-bristled brush to clean paint brushes instead, similar to those with which you’d wash your dishes.

Can I Use a Paint Brush Right After Washing It?
Using your paintbrush before it’s thoroughly dried can dilute latex paint or repel oil-based paint. This will affect your project. So we recommend waiting until the brush is dry.

How Do You Store Paint Brushes Between Coats?
If you’re coming back to the brush within the same day as you wait a few hours for the coat to dry, wrap the brush in plastic wrap. Make a tight seal by wrapping masking tape around the plastic wrap. Keep the brushes out of sunlight and away from hot spots in the home.

What is the Best Paint Brush Cleaner?
Knowing which is the best brush cleaner is tricky because it depends on the paint type. Water-based paints are easy to clean with soapy water, but you will need a solvent-based cleaner for oil paints.

Can You Wash Paint Brushes in the Dishwasher?
You cannot wash paintbrushes in a dishwasher. It will ruin the bristles and damage the wooden handles.
We Painted You a Picture
Now that we’ve painted you a picture of exactly how to clean paint brushes, you can ensure your brushes last for years to come. When you invest in paint brushes, the last thing you want is to waste that money by ruining your paint brushes.
To recap, the most important tip is to wash your paint brushes right away. Make sure you use the correct solvent according to what type of paint you used. And never wash oil-based paint off in a sink; always use a basin instead.
Whatever project you work on next will look 1,000 times better with these invaluable tips!