Eyelash extensions might be a beautiful self-care investment, but aftercare can be tricky. If you’re told to keep your lash extensions clean but realize you have no idea what that means, we can help.
We’ll show you how to clean your eyelash extensions daily so that your lashes are cleaner and last longer. You might even notice less irritation in your eyes.
This method will use lash shampoo, but we have some hacks for cleaning your lashes without it if you don’t have that product!
Keep reading, and soon enough, you’ll have the fluffiest lashes around.
Key Takeaways
- Clean eyelash extensions twice a day using lash shampoo or oil-free makeup remover.
- Avoid oil-based products, as they can weaken the adhesive and cause extensions to fall off.
- Be gentle when cleaning and brushing your lashes to prevent damage and premature falling out.
- Schedule refills every 2-3 weeks to maintain the fullness and appearance of your extensions.
How Often to Clean Lash Extensions
Clean your eyelash extensions as often as you’d clean your face, ideally twice a day, once in the morning and again in the evening. Eyelash extensions, like your natural eyelashes, will become dirty and oily, especially if you’ve been wearing eye makeup.
Another reason to clean them often is because they get dirty from regular activities such as swimming and exercising. The sweat and chlorine from exercise can ruin the adhesive on your extensions.
If you don’t clean your eyelash extensions daily, then the extensions can fall off early. Or worse, they become so dirty that you end up with irritated and sore eyes.
The Importance Of Cleaning
If you don’t clean your eyelash extensions, they can become crusty. This isn’t just a sign of dirt. In fact, it’s a sign of eyelash mites, also known as Demodex folliculitis (1). These tiny parasites are found in our facial follicles and love to eat the dead skin cells and oils on your eyelids. Eyelash extensions don’t cause these mites, but mites can harbor here. Poor hygiene can keep them around. So clean your lash extensions regularly!
How to Clean Eyelash Extensions
How can you incorporate eyelash extension cleaning into your skincare routine? We’ll show you how to wash your eyelash extensions with a lash shampoo or eyelash extension cleanser.
Just make sure it’s been 24 hours since you’ve had your appointment. Otherwise, you could damage the extensions.
- Time: 10 minutes
- Difficulty: Easy
What You’ll Need
- Lash shampoo or eyelash cleanser (such as Mereke Pretty or Stacy Lash)
- Oil-free makeup remover
- Cotton swabs
- Reusable makeup wipes
- Fluffy lash extension brush
- Clean mascara wand
1. Remove Makeup
Remove your makeup with an oil-free makeup remover and a reusable makeup wipe. If you use an oil-based makeup remover, the oil can weaken the adhesive on your eyelash extensions.
Use a cotton swab dipped in makeup remover to get close to the lash line, in the inner corners, and underneath the bottom lashes.
2. Apply Shampoo or Cleanser
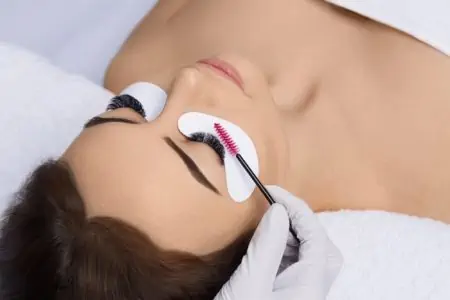
Apply your eyelash shampoo or cleanser onto your fluffy eyelash brush. Brush your eyelashes with the lash extension brush. Close your eyes and work the brush into your lash line, moving in circular motions. Then go from the base of the lashes down to the tip of the lashes.
Reapply lash cleanser as necessary and continue until your lashes are clean. Continue this for about one minute. Rinse the brush and repeat on the other eye.
3. Rinse the Lashes
Rinse your lash extension brush underwater until it’s clean. Then wipe down the lashes using the same circular motions, working from base to tip, to rinse the shampoo out of the lashes.
Repeat on the other eye.
4. Dry the Lashes
Use a clean and dry reusable makeup wipe to blot your eyelashes dry. Make sure you get on top of the lashes and underneath the lashes.
5. Brush the Lashes
Use your clean mascara wand to roll the brush through the individual lashes. This will separate the lashes, so they’re in place and not clumped together.
How to Clean Eyelash Extensions Without Lash Shampoo
What can you use if you don’t have lash shampoo or you’re without a cleanser? Well, there are three other products you can use for cleaning your extensions. They’re not exactly home remedies, but you might already have them at home. It could save you a trip to the store!
With Oil-Free Makeup Remover
Oil-free makeup remover can remove makeup and residue from your eyelash extensions without loosening the adhesive. Follow step one from above, using a cotton swab to get along the lash line. Then apply the makeup remover to your fluffy eyelash brush and clean your extensions.
With Foaming Cleanser
In a pickle, you can use your foaming face wash cleanser, following the same method as above. Just be sure that your cleanser doesn’t contain oils. For instance, the Aveeno Ultra-Calming Foaming Cleanser is a great option. Always rinse your lashes well after using a facial wash.
With Micellar Water
If you wear a lot of eye makeup, it can weigh down your lash extensions and get them dirty quickly. Micellar water can help remove that and leave your eyelash extension nice and clean. It can even moisturize your lashes. Just be sure that your micellar water is oil-free. Follow the above steps to clean your eyelash extension with micellar water. Simply use it in place of the lash shampoo or cleanser.
What to Avoid When Cleaning Lash Extensions
Now that we’ve shown you how to clean lash extensions properly, there are a few don’ts you should be aware of.
- No makeup wipes: Makeup wipes are convenient, but they could ruin your lash extensions. The wipes’ oils, emollients, and glycols can ruin the adhesive and cause your extensions to fall out.
- Don’t tug at lashes: Be super gentle and careful when cleaning your lashes. Move slowly over the lashes. When cleaning near the lash line, don’t be too aggressive, or this can cause your extensions to fall out early.
- No cotton buds on lashes: Cotton buds should be used for cleaning near your lash line or underneath your lashes only. Do not use them on the lashes. Nor should you use cloths or sponges, either. This can rip out your extensions.
- No oils: We’ve said it before, and we’ll say it again. Oil-based products are a sure way to break down the adhesive and cause your lashes to fall out early. Always check the ingredients of a product you’re considering to ensure it doesn’t contain oils. That includes coconut oil, vegetable oil, mineral oil — any oil, really!
- Avoid mascara and eyeliner: If you frequently add more eye makeup to your eyes, even though you already have extensions, you will end up with double the cleaning. This can add more friction and stress to your lash extensions, causing them to fall out early.
- Avoid high-pressure water: If you have a high-pressure showerhead, running your face directly under it can pull on your lashes.
- Avoid steam: Steam can weaken the adhesive on your lash extensions. So avoid steam face cleansers, facials, steam rooms, and saunas.
How to Care For Eyelash Extensions
We want you to get the best from your lash extensions. After all, they’re not cheap. Your beautician might have shared some extra care tips, but maybe you’ve forgotten. Take note because these hacks can help your extensions last longer.
- Clean daily: Cleaning your lashes twice a day can minimize oil and dirt build-up, causing your lashes to last longer.
- Clean before your next appointment: Before you go for your next refill, clean your lashes beforehand. This makes it easier to insert the refills, and therefore, you’ll have longer-lasting extensions.
- No cleansing for 24 hours: While the glue is still unstable, avoid getting your lashes wet or soapy for at least 24 hours.
- Invest in the right products: While you can use micellar water, a facial cleanser, or an oil-free makeup remover to clean your lash extensions, a lash extension shampoo or cleanser is the best way forward.
- Watch the oils: While you know not to use oil-based products in your eyelash cleaning routine, watch out for oils in other products. You might have oils in your skincare routine, moisturizer, face masks, or even in your shampoo and conditioner. Even a little contact with such oils can cause the adhesive to break down.
- Silk pillow: A silk pillow will be more gentle and initiate less friction than a regular cotton pillow. It’ll keep your eyelashes moisturized, too.
- Go for refills: Half-empty eyelash extensions can be pretty unsightly. Go for refill appointments every 2-3 weeks to keep your lashes full and fluffy.
- Apply protective coating: This is a bit of a bougie tip, but it can help protect your lashes. An eyelash-extension-specific protective coating can help your lashes last longer and look fuller between appointments.
- Brush when dry: After you’ve cleaned your eyelash extensions, wait for them to be dry before brushing them. Otherwise, you risk pulling them out.
How to Shower With Eyelash Extensions
We might have scared you with our tip for avoiding high-pressure water while wearing eyelash extensions. But it’s still necessary that you shower. How can you do so without destroying your extensions?
Really, the only thing you need to do differently is avoid putting your face directly into the flow of the water. Face away from the showerhead. If you usually wash your face in the shower, you will have to do that afterward outside the shower to protect your extensions.
Another tip is to avoid super hot steamy showers. Remember that the steam can weaken the glue.
If you get your eyelash extensions wet, don’t worry. They’re waterproof!
No Goggles
You might be tempted to wear goggles in the shower to protect your lash extensions, but this is a bad idea. First of all, it’s not necessary. Your eyelash extensions are waterproof and can get wet. Second, the suction from the goggles can catch your eyelashes and pull them out if you rip off the goggles too quickly.
FAQs

How Long Do Eyelash Extensions Last?
Usually around six weeks, but they can last anywhere between two and eight weeks. They will start to fall out after a couple of weeks, so you should schedule refills every 2-3 weeks.

Can I Use Baby Shampoo to Clean Eyelash Extensions?
Cleaning your lash extensions with baby shampoo seems like a good idea because baby shampoo has to be gentle, right? The thing is, baby shampoo contains perfumes, oils, and sulfates that can irritate your eyes and weaken the lash adhesive. Avoid cleaning your extensions with baby shampoo.

Can I Use Cetaphil to Clean Eyelash Extensions?
If you’re washing your eyelash extension with a facial cleanser, Cetaphil is a good option because it is oil-free.

Can You Make Your Own Lash Shampoo?
Are you looking for a home remedy? There are lots of DIY lash shampoo recipes floating around the internet. But we have to tell you — avoid these. First of all, most contain baby shampoo, which isn’t good for your lashes. Secondly, creating your own skincare can end up being irritating to your eyes. The last thing you want is an allergic reaction. Stick to professionally-made eyelash shampoo. Trust us!

Should You Brush Eyelash Extensions When They’re Wet?
Nope. Wait until your lashes are dry to ensure you don’t tug out any vulnerable lashes. Plus, it’ll be easier to fluff them into shape when they’re dry.

Why Are My Eyelash Extensions Itchy?
Eyelash extensions aren’t for everyone. In fact, many people have allergic reactions to eyelash extensions (2). The adhesive glue contains chemicals that you might find irritating. Within a couple of days, your eyelash extensions can become itchy. You might also notice a rash, a burning sensation, and swelling.
Another reason your eyelash extensions are itchy is because you didn’t fully shut your eyes during the procedure. The adhesive fumes may have gotten into your eyes and caused itchiness.
Lastly, itchiness can occur if you don’t care for and clean your eyelash extensions properly and frequently. Your eyelash extensions become a fluffy home for bacteria, oils, and dirt, which can quickly irritate your eyes.
See A Doctor
If the pain, itchiness, redness, and swelling doesn’t calm down after 48 hours, see a professional to get proper treatment.

How Long After Lash Extensions Can I Wash My Face?
After lash extensions, you can wash your face no earlier than 48 hours. You must use a water-based product rather than oil-based soaps that could damage the extensions and glue.
Bat Your Eyelashes
False eyelashes are lovely, but they do require quite a bit of work. You now know how to wash lash extensions the most effective way, so your lashes should last a while and be comfortable to wear.
Remember to clean your lashes twice a day as part of your skincare routine. While you can use products you already have — such as micellar water — we recommend getting a specific lash shampoo or eyelash cleanser. This will give you the best results while keeping your lashes in place.