There’s nothing more disheartening than taking a bunch of photos to go home to edit, only to find that your lens was dirty. Your images are now blurry, out of focus, or covered in smudges and fingerprints.
If that’s happened to you, then you need to know how to clean your camera lens. We’ll show you the best methods to keep your lens clean and images sharp, and to ensure that your lens lasts for years to come.
Keep reading for our favorite methods for both cameras and phones.
Key Takeaways
- Use an air blower or compressed air, a soft-bristled brush, or a microfiber cloth to clean the camera lens gently.
- Avoid using abrasive or chemical cleaners, and never use household products like Windex or hand sanitizer on the lens.
- Regularly check your lens for smudges, dust, or other spots and clean it as needed to maintain image quality.
- To keep your lens clean, use a lens cap, store your camera in a bag, and avoid touching the glass when changing lenses.
How Often Should You Clean a Camera Lens?
It depends on the state of the lens. The best rule of thumb is to clean it when it’s dirty. If you’re shooting all day, this might mean giving it a quick clean a few times a day. If you shoot once a week, you may get by with a weekly clean.
When you take your camera out of its case, check the front and rear of the lens. If you notice smudges, dust, or other spots, then clean your lens before you shoot.
How to Test a Dirty Camera Lens
Sometimes you can’t see the dirt and debris on a camera lens. You can perform a dirt test to check whether or not the lens needs cleaning. Here’s how:
- Set lens: Turn your lens to manual focus. Focus on the furthest point away and lock it in place.
- Set aperture: Set the lens to a narrow aperture. The higher, the better.
- Take a picture: Point the camera at a bright clear surface, such as a white wall or blue sky. Take a few photos.
- Check picture: Looking at the photo via your camera, phone or computer, zoom in on the image and check every part of the photo. If you see spots, streaks, lines, or smudges, then you will need to clean the lens and/or sensor.
How to Clean a Camera Lens
Let’s get into the best way to clean a camera lens. We have four different methods to try. You’ll notice that you can’t really clean lenses with household items. It’s essential to invest in specific lens cleaning products.
Find the best method for you or combine these cleaning methods for even more thorough results.
- Time: 5 minutes
- Difficulty: Easy
What You’ll Need
Choose one of the following:
- Air blower or can of compressed air
- Soft-bristled brush
- Microfiber cloths or lens wipes
- Lens cleaning fluid and cloth
With an Air Blower
- Position lens: Face the lens upwards. Make sure you have good light to see the dust and debris leaving the surface.
- Blow air onto the lens: Hold your air blower or compressed air at a 45-degree angle from one side of the lens. Blow air onto the lens and watch the dust and debris lift. Rotate the lens as necessary.
With a Soft-Bristled Brush
- Position lens: Face the lens upwards again. This allows you to clearly see what you’re doing.
- Brush: With a soft brush, sweep gently from one side of the lens to the other. Continue until you’re satisfied with the results.
- Don’t forget grooves: Use your brush to get into tight grooves and edges of the lens. You may also need to work harder to remove sticky residue on your lens.
Choosing A Brush
We recommend choosing a brush made of camel or goat hair, as these are super soft and won’t scratch your lens. Avoid touching the bristles with your fingers to prevent oil from transferring to the lens.
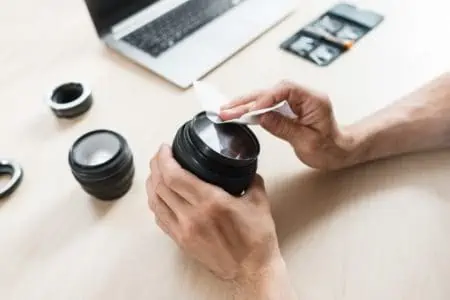
With Microfiber Cloth and Lens Wipes
- Position lens: Face the lens upright and work under good light.
- Fold the cloth: Fold your microfiber cloth into a padded square or triangle.
- Wipe: Gently wipe the lens to remove dust, debris, and streaks. Work from one side to the other. Then finish by moving in circular motions.
- Wipe with lens wipe: You can finish the job with disposable lens wipes. These have a cleaning solution on them which can provide a deeper clean and remove sticky residue.
- Airy dry: Leave the lens to air dry completely. This can take about an hour.
Microfiber Care
Microfiber cloths are reusable, so always ensure yours is clean before using it. When washing it, never use fabric softener. The chemicals in fabric softener can cling to the cloth and streak your lens.
With Lens Cleaning Fluid
- Apply liquid: Apply 3-5 drops of lens cleaner onto a microfiber cloth or lens tissue.
- Position lens: Hold the lens upright under good light.
- Wipe: Gently wipe the lens from side to side.
- Dry lens: Use a dry microfiber cloth or lens tissue to remove the residual fluid.
- Air dry: Leave the lens to air dry fully.
- Examine: Examine the lens to ensure it’s clean. If not, repeat the above steps.
How to Clean a Camera Lens Without Lens Cleaner
If you don’t have lens cleaner fluid or lens cleaning wipes but need something liquid to remove stubborn marks, you can make your own lens cleaner.
Simply mix distilled water with 99 percent isopropyl alcohol in a 50:50 ratio. Pour the solution into a spray bottle and mix well. Apply a few drops of the solution to a microfiber cloth and wipe the lens from left to right. Wipe again with a dry microfiber cloth, then leave the lens to air dry.
How to Clean Camera Lens Fungus
Camera lens fungus is a combination of moisture and dust that creeps inside the camera lens. The dust and moisture combination forms a fungus that can rapidly grow. It looks like spiderwebs or patches inside the lens. Over time, it can ruin your images and, eventually, your lens. Here’s how to remove it.
- Time: About two days
- Difficulty: Intermediate
What You’ll Need
- Direct sunlight or UV lamp
- White vinegar
- Water
1. Remove the Front Lens
The first thing you need to do is remove the front lens, often known as the lens mount or protective ring. You can use a lens wrench or spanner to do so, though some lenses are secured with screws. Once it’s detached, you can remove the glass and access the fungi.
2. Expose to Light
Place your front lens on a soft towel or microfiber cloth and lay it outside in direct sunlight for 24 hours. If it’s easier, you can place it under a UV lamp. The UV rays can kill fungi and prevent growth.
3. Clean the Lens
Once the fungi are killed, you still need to clean the lens. Mix a 50:50 solution of distilled white vinegar and water in a spray bottle. Spritz it onto a microfiber cloth and wipe the lens from left to right to remove fungi residue.
4. Dry Lens
Wipe the lens dry with a separate microfiber cloth. Leave it to air dry for 24 hours. Replace it to the lens.
How to Clean Camera Lens On an iPhone
You might not think about it too often, but your iPhone (and other types of phones) camera lens gets dirty, too. If you don’t clean it, your photos can look hazy or blurry. We’ll show you how to remove smudges and fingerprints on your iPhone. Your pictures will look amazing afterwards!
- Time: 15 minutes
- Difficulty: Easy
What You’ll Need
- Two microfiber cloth
- Lens cleaning fluid
- Lens sticker
1. Wipe Lens
Use a microfiber cloth to wipe the lens. Remove dust, debris, fingerprints, smudges, and other dirt.
2. Apply Fluid
Spritz a little fluid onto a separate cloth and wipe the lens from top to bottom several times.
3. Use Lens Sticker
After leaving the lens to dry for about 10 minutes, use a lens sticker to remove any extra dirt and dust from your lens. Afterward, use a dry side of the microfiber cloth to give it one more clean.
How to Keep a Camera Lens Clean
We want to ensure your camera and phone lenses are in the best condition possible. After all, we love to photograph our lives, and for those photos to be Insta-worthy, your lens needs to be clean. Here are our top maintenance tips:
- Use a lens cap: Always attach a lens cap when you’re not using your camera, especially before you place it into its bag.
- Use a camera bag: Using a camera bag can keep your lens safe from damage and dust.
- Avoid dust: Dust is the number one culprit for dirtying up a lens. Avoid dust by properly changing lenses. Always tilt the camera down when you change lenses. Wipe dust and dirt off your lens mount and lens regularly. Cleaning your camera lens before each use is super helpful at kicking dust to the curb.
- Avoid certain cleaners: Don’t clean your lens with abrasive cleaners, chemical cleaners, hard-bristled brushes, baby wipes, clothes, cotton swabs, or soap. These can damage the lens and the protective coating, and leave behind lint.
- Avoid moisture and humidity: Try and keep your camera in a cool or warm, dry, environment. Heat and moisture can damage your lens. You can buy dry cabinets to store your lenses and cameras if you live in a humid environment.
- Avoid touching the lens: The more you touch the lens glass, the dirtier it will become. When changing lenses, try to avoid touching the glass.
- Use a UV filter: Some photographers like UV filter protective lenses, which protect your actual lens from dirt and smudges. It can also prevent cracks and scratches. You don’t even need to remove this cover while you’re shooting!
FAQs
Cleaning Cameras Carefully
When your camera lens needs cleaning, you must follow these methods. Using any old cloth or cleaner can damage your lens, cause scratches and wear down the protective coating.
You must only use the suggested materials, such as an air blower, microfiber cloths, or lens cleaning fluid. When in doubt, take the camera to a professional.
Overall, these methods will work great on all kinds of camera lenses, whether you have a chunky Canon DSLR, a beloved Nikon, a laptop webcam, or a regular smartphone. Keep your lenses clean and your images sharp.


