Did you know that grease, grime, dirt, and bacteria build on the keys of your keyboard causing it to become one of the dirtiest places in your home? You end up touching this filthy area every time you sit down at your computer.
Thankfully, you’re not stuck living with a dirty keyboard. Today we’re going to discuss how to clean a computer keyboard no matter whether it’s a gaming keyboard or a laptop keyboard.
Key Takeaways
- Clean your computer keyboard weekly to remove dirt, bacteria, and prevent illnesses.
- Use methods like turning it upside down, keyboard brush, compressed air, cleaning gel, rubbing alcohol, or screen wipes to clean your keyboard.
- For keyboards with removable keys, take a picture, remove and soak keys, clean the keyboard, scrub keys, dry, and reassemble.
- Keep your keyboard clean by not eating at your desk, washing hands before use, tapping out dirt, keeping pets away, and using a silicone cover.
How Often Should You Clean a Computer Keyboard?
You should clean your computer keyboard at least once a week. People eat and drink at their computers, and the grease and grime transfer from their fingers to the keyboard. This makes a wonderful breeding ground for bacteria that can cause acne or transfer illnesses from person to person.
How To Clean a Keyboard
When it comes to cleaning a keyboard, you have several options. You can use all of the options or just the easiest methods to clean your keyboard at home in a jiffy.
By Turning It Upside Down
Turn off your keyboard and unplug it from your computer. Turn it over and gently tap the underside to dislodge any crumbs and dirt hiding in among the keys. Make sure it’s over a surface you don’t mind becoming covered with dirt such as a towel or table.
If your keyboard has removable keys, many mechanical keyboards have these, you can remove the keys to clean underneath them. Be sure to gently tap the underside of your keyboard to jar the crumbs loose.
With a Keyboard Brush
Use a specially designed keyboard brush to brush your keyboard. It looks and functions much like a duster. Just brush the keyboard to remove any grime hiding under the keys.
A toothbrush can be used to brush your keyboard as well. Run it between the keys to remove the dirt.
With Compressed Air
Compressed air such as the Falcon Dust Off is invaluable when you’re cleaning a keyboard without removing keys. Insert the red straw into the nozzle of your can of compressed air, then point the straw at your keyboard. The air will blow the loose dust out from under the keys.
Removing the keys allows the compressed air to be more effective at removing the dirt. When you’ve finished cleaning your keyboard with the compressed air, turn it over and tap it again. Some dirt may have loosened and will now fall out of your keyboard.
With Cleaning Gel
Another option for cleaning your computer without compressed air is to use a keyboard cleaning gel. This sticky gel pushes its way underneath your keys collecting crumbs, dirt, and grime.
Be careful though as the gel may leave an oily film behind on your keyboard. Just use some cotton swabs or pipe cleaners to remove the film if this happens.
You will also need to replace the cleaning gel periodically as it will become dirty over time.
With Rubbing Alcohol
The best way to clean a keyboard with alcohol is to first dip a cotton swab into rubbing alcohol. Make sure the swab is wet but not dripping as you do not want to expose your keyboard to too much liquid.
Gently wipe around the keys with the cotton swab, replacing the swab when it becomes dirty.
You can also dip a microfiber cloth into the rubbing alcohol. Again, you want the cloth to be damp but not dripping wet. Gently wipe down your keyboard with the cloth focusing on the top of your keys.
Use a dry microfiber cloth to remove the last of the dust and to make your keyboard shine.
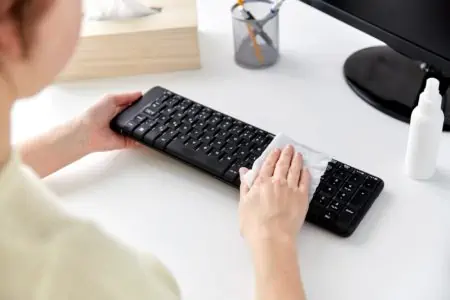
With Screen Wipes
You can also use screen wipes or disinfecting wipes to clean your keyboard. First, wring out the wipes to make sure they’re not dripping wet before gently wiping down the top of your keyboard. Gently wipe between the keys to the best of your ability as well.
When you have finished wiping down your keyboard, use a clean microfiber cloth to remove any last particles of dust and to make your keyboard shine.
How to Clean a Keyboard With Removable Keys
Some keyboards have removable keys which make them much easier to clean.
- Time: 1-2 hours
- Difficulty: Intermediate
What You’ll Need
- Camera
- Dish soap
- Bowl
- Rubbing alcohol
- Cotton swabs
- Keyboard brush (optional)
- Microfiber cloth
- Towel
1. Unplug Keyboard
Before you remove the keys on your keyboard, take a picture of your keyboard. This will make sure that you know where to return each key after your keyboard is clean. Now unplug or remove the batteries from your keyboard.
2. Soapy Water
Fill the bowl with water and add a squirt of dish soap. Mix it with your fingers until the soap is dissolved into the water.
3. Remove the Keys
Remove the keys on your keyboard and drop them into the bowl of soapy water to soak. Allow the keys to soak for 30-60 minutes.
4. Clean the Keyboard
While the keys are removed, gently clean the keyboard itself with rubbing alcohol and cotton swabs or a keyboard brush to remove all the grime underneath the keys.
5. Scrub the Keys
Use the microfiber cloth to gently rub the keys and remove any dirt on them. Rinse the keys with fresh water and lay them on a towel to dry.
Wait until the keys are completely dry before moving on to the next step. This will prevent you from accidentally damaging your keyboard.
6. Reassemble Keyboard
The final step is to reassemble your keyboard. Use the picture you took in the first step to help you figure out where each key should go.
What to Avoid When Cleaning a Keyboard
When you’re cleaning a keyboard, there are a few things you should avoid doing so you don’t damage your keyboard during the cleaning process.
- Don’t remove the keys of your keyboard unless you know how to remove and replace the keys without damaging them.
- Rubbing alcohol can react with the plastic on your keyboard, so be careful not to use too much rubbing alcohol when you’re cleaning the keyboard.
- Never spray water directly onto your keyboard as you could cause it to short circuit.
How to Keep Your Keyboard Clean
There are a few tips you can follow that will prevent your keyboard from getting too dirty over time.
- Don’t eat at your desk. This will prevent the grease and grime from transferring from your fingers to your computer.
- Wash your hands before using your keyboard, especially if your hands are dirty or you’ve been eating greasy food.
- Turn your keyboard over and tap out any dirt, hair, and crumbs that may have fallen onto it.
- Keep pets away from your keyboard. This will prevent pet hair from collecting on the keys.
- Place a silicone cover over your keyboard to keep dirt and dust from falling on your keyboard when it’s not being used.
FAQs

Can Alcohol Damage Your Keyboard?
Yes, wine and beer can damage your keyboard as they can cause it to short circuit.
If you accidentally spill alcohol on your keyboard, immediately flip it over onto a towel to drain. Unplug your keyboard and then wipe it down with rubbing or isopropyl alcohol. Wait to use your keyboard until it has completely dried.

Can You Clean a Keyboard In the Dishwasher?
Yes, you can clean a plastic keyboard in the dishwasher but it’s not recommended. Doing so will void any warranties and may even damage or destroy your keyboard.
Remove any batteries from your keyboard and make sure you have an extra keyboard to use as it will take a week to dry. Put the keyboard on the top rack and set your dishwasher to rinse only with as cool of water as possible. Excessive heat may damage or destroy your keyboard.
Do not wash any other items with your keyboard.
After the keyboard is washed, tip it over to allow water to drain. Place it key side down on a towel to dry for the next week.

How Do You Fix Sticking Keys?
First, make sure the keyboard is not plugged in and the batteries are removed. Then gently remove the sticking keys from the keyboard. You may need a key puller for this operation.
Dip a cotton swab in rubbing alcohol and use it to carefully clean the keys and plungers. Replace the keys on the keyboard and allow the keyboard to completely dry before attempting to use it again.

What Do You Do If You Spill Something On Your Keyboard?
If you spill something on your keyboard, immediately flip it over and allow the liquid to drain. Unplug it as quickly as possible. Then leave your keyboard face down on a towel for at least 24 hours to allow it to completely dry before you attempt to use it again.

Can I Soak My Keycaps In Rubbing Alcohol?
It’s not recommended that you soak your keycaps in rubbing alcohol. Sometimes it will react with the plastic causing the keycaps to become foggy and damaging your keyboard. Instead, soak your keycaps in soapy water for 30-60 minutes.

Is it Safe to Vacuum a Keyboard?
It is safe to vacuum your keyboard, provided you use the soft brush attachment to avoid scratching the keys.