Our showers are places we naturally associate with cleanliness. Unfortunately, if you’ve discovered mold inside yours, you’re likely experiencing a mixture of shock, disgust, and confusion.
It’s understandable to want to destroy the offending growth as quickly as possible. However, it’s essential to be educated on a couple of things before you take action.
For one, not every component in your shower can be treated similarly. Also, using certain products can make things worse. Our guide on how to get rid of mold in showers will detail what you need to know to handle the problem.
Key Takeaways
- Mold in showers is caused by moisture, lack of ventilation, and negligence in cleaning.
- Use mold removers, bleach, steam, disinfectants, or essential oils to clean mold effectively.
- Avoid using plain water or deviating from the manufacturer’s guidelines on cleaning products.
- Specific cleaning methods depend on the affected surface, such as grout, caulk, tiles, or showerhead.
What Causes Mold in Showers?
Most bathrooms are hospitable environments for mold growth (1).
Mold is a type of fungus. Specific fungi produce mold spores that travel in the air. These spores settle and grow in areas with everything they need to thrive.
All mold spores need to survive are a food source, moisture, and appropriate temperatures. Unfortunately, the ideal temperature range for mold is pretty broad. This means you can’t freeze or heat it to death easily (2).
Some species can consume wood, paper, soap residue, and even oil residue from your skin to grow (3).
Now that you know the fundamentals of mold, you can probably hazard a guess at why your shower is playing host. Here are the possible reasons:
- Poor ventilation: We know it’s impossible to keep your shower dry all the time. Still, if your shower is constantly damp due to a lack of ventilation in your bathroom, it isn’t surprising that mold took hold.
- Leaks: A leaking shower head or faucet translates to a constant source of moisture. This is the case even when your shower isn’t in use and otherwise dry.
- Negligence: Can’t remember when you last cleaned all the cracks and crevices in your shower? Then, mold can take the opportunity to grow unhindered, for instance, in areas such as your sliding door seals or wall corners.
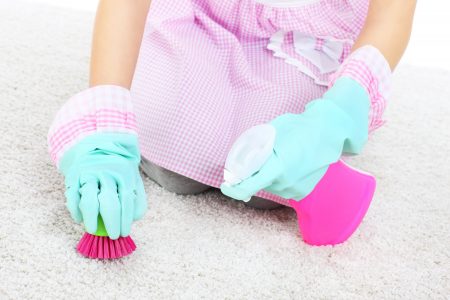
Products You Can Use to Clean Mold in Showers
These are suitable products you can arm yourself with to get rid of mold in showers:
Mold Remover
Mold removers are solutions designed to destroy fungi. They’re usually made with acids and other substances. These components can eradicate mold without damaging the underlying surface.
How to Use It:
- Follow the instructions on the bottle. Ensure it won’t harm the surface you’re using it on (e.g., chrome, tile, etc.).
Bleach
Bleach is the champion of cleaning products. Unsurprisingly, bleach-based solutions can be effective at eradicating mold on a variety of surfaces. No wonder the Center for Disease Control (CDC) supports using bleach against mold (4).
How to Use It:
- Combine one cup of bleach along with one gallon of water.
Steam
Water is a friend to mold, but not when it evaporates into steam at 212 degrees Fahrenheit (5). Even the hardiest temperature-resistant species will die when the temperature surpasses 140 degrees Fahrenheit.
How to Use It:
- Buy or rent a steam cleaner and use it as directed.
Disinfectants
We don’t mean the type of disinfectants you use on yourself. Instead, any disinfectant that contains phenols (phenolic detergents) should do the trick. An added benefit is that phenols can suppress mold growth as well as other bacteria, viruses, and more (6).
How to Use It:
- Dilute the disinfectant in water according to the manufacturer’s specifications.
Vinegar and Baking Soda
Many of you probably consider vinegar and baking soda an indefatigable team. That may be true for other cleaning jobs. However, you may want to use it as a backup or finishing touch for this project.
Despite its reputation as a natural fungicide, vinegar came up short against two typical strains of household molds. It had little to no effect on inhibiting or stopping growth (7).
How to Use It:
- Add half a cup of baking soda to one cup of vinegar.
Essential Oil
If you’re not keen on going the chemical route, there’s hope yet. Some essential oils have demonstrated effectiveness against mold (8):
- Clove oil.
- Eucalyptus oil.
- Lavender oil.
- Pine oil.
- Tea-tree oil.
How to Use It:
- Dilute 25 drops or so of your oil with half a cup of isopropyl alcohol and plain water.
What You Should Avoid
We all have unique preferences for cleaning agents. But when it comes to nasty invaders like mold, it’s vital to use solutions that not only remove it but kill most or all of the residual spores. Otherwise, you’re likely to end up with a recurrence.
- Your own mix: Never deviate from the manufacturer’s guidelines on household detergents. Don’t use an undiluted cleaning agent or play the scientist to make a more powerful solution. You could injure or intoxicate yourself (9).
- Plain water: Blasting the mold off your shower wall or door won’t do the job. Even if the growth is physically gone, it can return.
How to Get Rid of Mold in Showers
Before you start, there are a few preparatory steps to take:
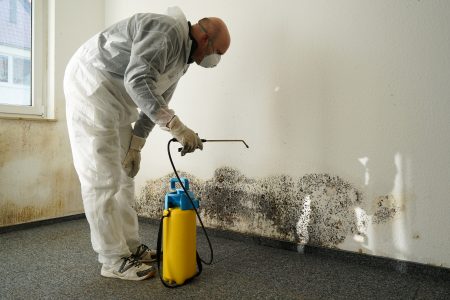
- Be realistic: If the affected shower is one you haven’t used for a long time, the mold growth could be severe. If the fungi have colonized an area larger than three feet by three feet, call a professional (10).
- Stay safe: Before you engage in battle with the mold, protect yourself. Wear gloves, a mask, and goggles to shield yourself from floating mold spores. Keep doors and any windows open for air circulation.
- Prepare your equipment: Have your cleaning agent or steam cleaner ready for action. Grab your sponge or scrub brush and paper towels.
- Keep pets and kids away: Mold spores can provoke allergic reactions in some individuals. So make sure your family members steer clear of the bathroom while you work.
- Clear the area: Get all your shampoo bottles, loofahs, and other bathing items out of the shower. Check every item for mold contamination if it was near the growth site.

Grout
If your grout (the material binding between your tiles) is moldy, here’s how to get it spotless again:
Cleaning Method
- Apply solution and wait: Spray your agent of choice over the moldy area. Let it sit for between 10 and 15 minutes or as specified by the product label.
- Wipe: Use paper towels to remove the bulk of the mold from your grout. Dispose of them in a trash bag.
- Scrub: With a stiff-headed scrub brush or an old toothbrush, get to work scrubbing the grout.
- Rinse and repeat: Rinse the grout with warm or hot water, and re-apply your cleaning agent. Do this several times.
- Final rinse: Rinse the grout off and ensure no mold trace remains.
- Dry and seal: Sealing your grout with a water-repellent sealant should lower the risk of mold recurring (11). But do not apply the sealant until the grout is fully dry.
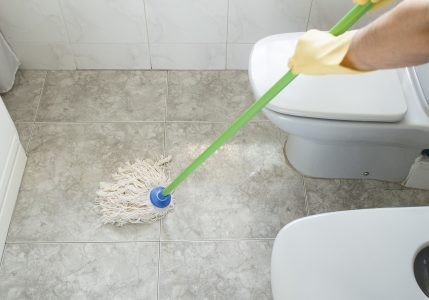
Steam Cleaner
Steam the moldy area using a scrub brush attachment. Continue steaming for at least one or two minutes to ensure all growth is gone. When you’re done, and the grout is dry, consider using a sealant to repel moisture.

Caulk
If the caulk in your shower is the victim of mold, here’s how to clean it:
Cleaning Method
- Apply cleaning agent: Spray on your chosen mold-fighting product.
- Cover it up: Stick sheets of toilet paper, paper towels, or plain cotton balls on top of the caulk.
- Leave it: Let the solution sit for at least 12 hours. You can leave it on for up to 20 hours if you wish.
- Scrub and rinse: When the time is up, get your safety gear back on and scrub the mold. It should come off effortlessly.
- Repeat: Clean the caulk a few more times, rinsing and repeating.
- Re-apply caulk if needed: If your caulk is aging and cracking, a fresh application may be necessary. Only do this once your caulk is dry.
Warning
Steam Cleaner
Steam the caulk until the mold comes off. Rinse the fallen pieces or dispose of them using tissue or paper towels. Steam for a minute or two.
If your caulk is falling apart, apply a new coating when the old one is dry.

Tiles
The ceramic and porcelain used in showers are usually waterproof or vitreous (less absorbent) out of common sense. That means the mold is less likely to have penetrated beneath the surface of the tile, hopefully. This should make it a tad easier to clean.
The steps here apply to most shower floors.
Cleaning Method
- Spray solution and let sit: Spray your chosen product on the moldy tile and wait for it to loosen up the mold. That’s 10 to 15 minutes for DIY products and as directed by your mold remover of choice.
- Wipe away mold: Wipe the mold away with a tissue or paper towel and throw it away. It should slide off the surface of the tile easily.
- Repeat application: Re-apply your cleaning agent to the surface and clean it as you would normally. Rinse periodically.
Steam Cleaner
First, try wiping as much of the mold off as you can with a paper towel or tissue. If it doesn’t come off, start steaming. Wipe the area frequently, and steam it again even when it looks pristine.

Ceiling
We strongly recommend using steam for tile or concrete ceilings. Pick an attachment that allows you sufficient reach to stay out of the steam zone.
If you decide to use a cleaning product, there’s a risk the solution will drip back down on you as you work.
Many ceiling tiles are made of mineral fiber (12). If this is the case with yours, you may need to replace them entirely, as getting rid of mold from porous material is tricky. The same thing applies to wooden ceilings: you may need to involve a professional.

Drain
A moldy drain is disturbing to look down on while you shower. Get it shining like new again with these steps:
Outside of Drain:
- Cleaning product: Liberally apply your cleaning product. Then allow it to sit on the mold for 10 to 15 minutes or as the detergent instructs. Scrub away the mold, rinse and clean the area a few more times.
- Steam: Direct steam at the mold and watch it disappear down the drain. Steam and repeatedly rinse until the drain and surrounding areas are mold-free.
Inside of Drain:
Apply a drain cleaner as directed. These powerful detergents will clear away mold near the surface of the pipe and unclog your pipes to boot.

Showerhead
For convenience, we suggest removing your shower head. Reaching and cleaning the component while it’s still attached can be awkward.
- Remove showerhead: Unscrew your showerhead from the hose or arm it’s attached to.
- Take it apart: If you can take your showerhead apart, do so. There may be mold growing within the head too.
- Let soak: If you can, submerge the showerhead in your solution of choice. The next best option is to spray the head with your product and let it sit. Leave it for no less than 10 minutes.
- Rinse: Using warm or hot water, rinse your showerhead. Take your time doing this — you don’t want residual bleach or detergent hitting your skin with water the next time you shower.
- Re-install: Put your showerhead back together and install it again.

Shower Curtain and Shower Curtain Liner
If your shower curtain or the curtain liner has collected mold, all hope isn’t lost. You don’t necessarily need to throw either one away. Whether the item in question is plastic or fabric, here’s how to de-mold it:
- Check label: Check the label on the shower curtain or liner to see if it’s machine washable.
- Take off mold: Using cleaning wipes or your cleaning product and a sponge, attempt to get as much mold off as possible.
- Wash: Add a generous quantity of detergent and machine wash your shower curtain or liner on a cold or delicate setting. If you aren’t sure about washing machine compatibility, hand wash instead. Only use fabric-safe detergents on cloth curtains, or you risk discoloration or damage.
- Let dry: Hang your shower curtain or the liner up to air dry. Put it back on your shower once it’s fully dry.
Shower Door
- Apply solution: Spray your preferred cleaning solution or product on the mold.
- Wait: Let the solution sit on the mold as directed by the product label, or for 10 to 15 minutes if you’re using a homemade cleaner.
- Wipe: Wipe off the mold with paper towels, which should come off without a fight. Throw them away.
- Clean thoroughly: Clean your doors, paying particular attention to the areas mold is growing. Don’t forget the joints and sealant — use a toothbrush to get into tight spots.
- Rinse: Use warm or hot water to wash away your cleaning solution.
- Dry and polish: Dry off your shower doors and polish them. You can apply a water-repelling product to help your doors stay clear for longer.
Steam Cleaner
- Wipe first: Try to wipe away as much of the mold as possible so that it doesn’t run down the door when you begin steaming. You can use one of the cleaning solutions we suggested above.
- Steam: If it doesn’t come off, begin steaming. Be sure to point your steamer at the joints and sealant of the door too. Mold is most likely to accumulate in these areas.
- Dry and polish: Use a clean cloth to dry off your shower doors. Finally, apply a water-repellent solution to keep them shiny and clear (if you want).
Tips for Preventing Mold in Showers
You’re now an expert on how to get rid of mold in showers, and you know why it happens. It’s time to discuss prevention so that you don’t end up in the same situation again.
- Increase ventilation: Aim to boost air circulation in your bathroom as much as possible. Switch on the vents after you shower, or at least leave doors and windows open. If your bathroom has no windows, you might want to invest in a dehumidifier to take moisture out of the air.
- Fix leaks: Now is the time to repair that leaking shower hose or dripping faucet. A constant source of moisture makes for prime real estate for opportunistic fungi.
- Clean regularly: It sounds obvious, we know. But cleaning your shower weekly can inhibit mold from settling in and growing.
- Be thorough: When you’re in cleaning mode, don’t forget cracks and crevices. As you know, mold can grow anywhere in your shower. Take your shower head down every so often and soak it in your favorite cleaning agent.
FAQs

Is It Mold or Mildew In My Shower?
It is probably mold in your shower because they are damp environments and ideal for encouraging fungal growth. Once the spores take hold, they can be challenging to remove.

Is Black Mold In a Shower Toxic?
The black mold in your shower could be toxic, depending on the strain. Either way, black mold is unsightly and possibly dangerous, so don’t hesitate to act when it appears.

How Do You Get Rid of Mold Under Caulking?
There are several ways to get rid of mold under caulking, including bleach, white vinegar, hydrogen peroxide, baking soda, and ammonia. If you use ammonia, open windows to allow airflow and wear a facemask.
Also, never mix bleach with ammonia because it creates toxic fumes that cause health side effects.

Can I Caulk Over Moldy Caulk?
You can caulk over moldy caulk, but pretty soon, the mold will show through. You should always treat the source of the mold before caulking over the top.

How Do You Keep Black Mold From Coming Back?
The best way to keep black mold from coming back is to create the right conditions. Use a dehumidifier to extract moisture, keep surfaces dry, and always treat areas with a detergent like bleach or white vinegar.
Enjoy Fungi-Free Showers
A moldy shower is not only gross, but it can be unhealthy to expose yourself to mold spores daily. If you’ve been dealing with a persistent sore throat or irritated sinuses, it may be due to fungi in your shower.
Tackling small mold patches isn’t as intimidating as you might have thought. Don’t forget to call in a professional if the mold is widespread.
Prevention can be the ultimate weapon against mold. If you do your best to make your shower inhospitable for mold colonies, they won’t have a chance to grow.